Showing posts with label winter. Show all posts

Friday, August 30, 2013

Homemade CocoHodo

So I’m writing this post as I sit on the plane to go on holidays. And mannnnn it is boring. So I decided that I’d just write up another blog post, even though this post won’t be going up for a couple of days.

I hope that you guys enjoyed the last post, Tom n Toms style honey bread, I’m really craving some at the moment……… too bad I’m on a plane and not actually going to a place that has Tom n Toms.

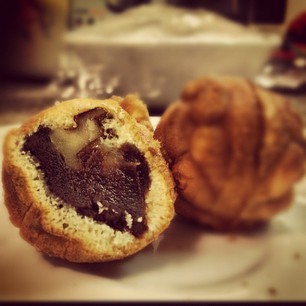
Anyways, today I’m going to be introducing you to another Korean snack food, and that is the coco hodo’s. These are little walnut pastries that are shaped like a walnut. These are particularly popular during winter when you can get them from street vendors. They are a particularly good in between meal snack to take on the go. They are quite inexpensive to buy, but it is always more fun to make your own.

To me I’d call them Korean profiteroles, although not really. It's made from a walnut pastry with a red bean filling and are AMAZING. The name is a bit deceiving when it is said in English, you sort of expect it to be made with chocolate coco = cocoa, but that might be just me.

-------------------------------------------------------------------------------
And that was all I got up to on the plane. I never actually managed to finish the post and here I am more than a month after returning finishing off the post. I'm so sorry for not posting much over the last 2 months, but I couldn't even access blogspot when I was on holidays and uni just got so overwhelming when I returned. I mean I've got exams in like 1 1/2 weeks and I and epically screwed.

Anyways, I hope that this recipe is going to satisfy your craving for new recipes and I'll try my best to put out recipes on a more regular basis. It should be quite easy once exams are over this semester. And I can't wait to share photos of the food that I ate whilst I was on holiday.

Anyways, back to today's recipe. Coco hodo. I'm pretty sure that I've covered all the introductory bases so let's move on to the recipe. I'm going to use a profiterole kinda pastry, so a choux pastry since I have no idea how to make the actual pastry, but I'll be adjusting it so it is similar in taste.

Ingredients
125 ml water
125 ml milk
100 grams butter
pinch of salt
100 grams flour
50g walnut flour (or almond meal) -- gives a nutty taste
4 eggs
1 cup red bean paste (store bought or home made)
2 tbs double cream
50g walnuts

Method
1. Heat the oven to 220ᴼC.
2. To make the pastry, melt the butter with water and milk in a large pan.
3. Bring to boiling point and tip in salt and flour. Using a wooden spoon beat hard for up to 30 seconds, till the dough no longer sticks to the sides of the pan.
4. Cool to room temperature (about 10 minutes).
5. While the dough is cooling, line 2 baking trays with baking paper.
6. When the dough has cooled beat the eggs, one at the time till the dough is smooth and glossy. Pour the dough into a pastry bag and pipe out profiteroles (about the size of a walnut) leaving enough space for them to rise, otherwise spoon with teaspoons. Tip your fingers in cold water and smooth the surface of profiteroles, as any spikes are likely to burn.
7. Bake the profiteroles in 220ᴼC for 10 minutes, then reduce to 190ᴼC and bake for another 15-20 minutes, until golden brown.
8. Using a knife poke a hole in each profiterole to let out the steam (and to fill later) and leave them to cool on a rack.
9. While the pastry is cooling prepare the red bean paste. You can adjust the sweetness of the paste to your liking and to make it extra smooth and creaming add 2 tbs of double cream.
10. Also cut the walnuts coarsely and mix it through the red bean mixture.
11. Fill a piping bag with the paste and get ready to pipe the pastry when it is sufficiently cool.
12. Fill the pastry with the hole that is at the base of the pastry.

And you are DONEEEEEEE.


This doesn't turn out to be a chewy as the original, but the pastry remains light and fluffy. It's not the easiest thing to make, but it is nice because it means you can still enjoy coco hodo even if you aren't near a store.

So I hope that you liked this recipe, and I'll try my best to post more often. Maybe in about 2 weeks time I'll have another post out. Until ten remember to stay safe, happy and healthy!!! 
Wednesday, June 26, 2013

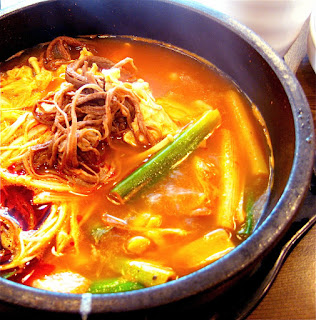
육개장 YukGaeJang

Heyyyy dere sexy peoples.

It's been a really long time since I have posted a blog :/ I have been busy with finals for uni and completing assignments so there hasn't been any post for a really long time :( BUT I finished all of my exams yesterday, so I'm not back with a recipe. I'm going to be on break until August so I'll probably try and do a post a week, possible more sometimes.

I hope that you have all been well ~~~

Let's see how we are going in terms of seasons, it's now summer in Korea, so we probably want some summer food right? Even though it is not the hottest time of the year just yet, this dish can still be something that you can enjoy to help cool you down. And it is also great for the colder countries in the southern hemisphere where it is winter at the moment,

The dish for today is called yukgaejang (육개장). It is a spicy soup-like dish that is made with beef and scallions as well as other ingredients such as bean sprouts (kong namuel), bracken, taro stem, onion and dangmyeon (sweet potato noodles). It is usually served with rice and kimchi.

The dish can also be made using chicken, and in that case it could be called dak yukgaejang.

This is a hot spicy dish so you may be confused about why it would be eaten in the summer. Western cultures tend to eat cold foods to cool down in the summer, this cools you down from the inside. However in Korea, they also like to cool themselves down from the outside by eating hot spicy foods to sweat more and thus also be cooled that way.

Ingredients
600g beef brisket
1 small onion
100g bean sprouts
50g taro stem (found dried in Asian marts)
50g bracken (found dried in Asian marts)
3 green onions
1/2 korean radish
3 tbs chilli flakes (gochugaru)
2 tbs minced garlic
3tbs soy sauce
60ml sesame oil
60ml vegetable oil
3tbs salt
1tbs pepper
4L water

Method
1. Soak the taro stem and bracken in warm water for an hour.
2. In a large pot add beef, onion, green onions and all the water. Boil it for 30min on a medium heat with the lid on.
3. Blanch the soaked taro stems and bracken in water for about 10 minutes. Squeeze all the water out and then cut into 10cm pieces.
4. Cut the radish into 1cm pieces
5. Remove the cooked beef from the broth and let it cool for 30 min. After that, tear the beef into small strips.
6. In a bowl mix half the chilli flakes, with 3 tbs sesame oil, soy sauce, garlic, 1tbs salt and the pepper. If you want you can add more chilli flakes.
7. Add the bracken, taro stem and meat in a bowl with half of the sauce and let it sit for 10 minutes.
8. Add the sauce mixture into the broth with the radish and boil it for 40min on a medium heat.
9. In a small pot add all the remaining oil and chilli flakes and stir fry for 2 minutes, constantly stirring to prevent burning.
10. Strain the chilli oil through a cheesecloth.
11. Add some more green onions, bean sprouts, rest of the spicy sauce and chilli oil to the broth and salt to season. Boil for another 10 minutes.
12. Serve with rice and kimchi.

And there you have it, a nutritious dish to eat in summer or winter to cool you down or to warm you up. Either way it is bound to satisfy you.


I hope that you like that dish because it is certainly what I'm going to have for dinner tonight as it is super-duper cold and rainy at the moment. Have a try of it when it is super hot or cold and you will feel the heat of the dish radiate throughout the rest of your body.

I'm going to post more in the coming days, and until then remember to keep warm, safe, healthy and happy!

Sunday, May 5, 2013

Cookbook and Apple and Rhubarb Cake

Hey everyone, it has been so long since I've last posted a recipe and I'm really sorry about that but I've had exams. The exams are now over so I'll be posting a recipe tonight. But before I do that I have some very big news to share with you all.

I actually submitted one of the recipes on this blog for a cookbook competition at my university and it happened to get accepted. So it seems that one of my recipes is now going to be published into a cookbook. For those of you that are wondering the recipe was the one for the Gyeran Bbang, it's simple, cheap, delicious and perfect for a student like me. There was a photo shoot and all that jazz, and they are even going to film the recipe so you can also watch a video of it. There is going to be a book launch and everything, so I'm super proud about this and I'm so happy to finally be able to share it with all of you! If you haven't seen that recipe before do have a look at it, it's super scrumptious.

Now to move on to the blog for today. today's post is going to be a simple feel good dessert. It is starting to get cold here, as we start May so I thought what's better than a good old apple and rhubarb crumble. Only today I'm going to change it up a bit and convert it to a cake.

Apple and rhubarb cakes are wholesome and warm and are the perfect thing to keep you going on a cold night, or even as the spring approaches because that's technically the rhubarb season. A bit of custard or ice-cream on the side and you have the perfect dessert.

Ingredients
60 g soft unsalted butter
380g brown sugar
2 eggs
1 tsp vanilla extract
300g plain flour
1 tsp sodium bicarbonate
2 tsp ground cinnamon
1/2 tsp ground nutmeg
1/2 tsp ground allspice
1 cup sour cream
grated rind of 1 lemon
250g chopped rhubarb
250g chopped apples
80g brown sugar, extra
1tsp ground cinnamon, extra
Custard or ice-cream to serve

Method
1. Mix butter and sugar in processor until blended.
2. Add one egg at a time, mixing well between additions.
3. Add vanilla extract and mix well. Sift flour, spices and sodium bicarbonate together.
4. Fold into egg mixture alternatively with combined sour cream and lemon rind.
5. Fold rhubarb and apple in using a wooden spoon.
6. Spoon mixture into a 23cm spring form pan lined with baking paper on bottom and sides.
7. Combine extra brown sugar and cinnamon and sprinkle over cake.
8. Bake at 175C for about 1 hour and 50 minutes, or until cooked when tested with a skewer.
9. Cool in pan.
10. Cut and serve with a scoop of ice-cream or a generous amount of warm custard.


And here is the recipe for my version of an apple and rhubarb cake. I hope that you guys enjoy it, enjoy the weather and the fresh foods that are available at this time of the year, it is usually one of the best. 

I'll try and post more recipes up, until I have my final exams at least....so until the next post have fun, enjoy the sun but remember to stay healthy, safe and happy! 

Friday, April 5, 2013

Steamed Egg Casserole 계란찜 Gyeran Jjim

It has been a REALLY LONG TIME SINCE I'VE LAST POSTED.

I didn't realise just how long it had been until earlier this week when I checked this blog. I am so sorry for not posting for so long, I've been juggling uni and work and just trying to find my footing as there are so many things going on.

Hopefully I'll be able to get into a regular schedule with these recipe posts once I've got everything sorted out.

To make up for not posting I'd like to tell you all that I managed to have over 1000 hits on my blog in the month of March, which was AMAZING because I didn't even post a recipe up. Thank you guys so much. You're what keeps me going.

And today I'm going to be sharing a simple recipe; nothing too fancy but comfort food. It's getting a bit colder in Sydney these day, especially over the past week so this will be a dish that is ready to warm you up.

Today's recipe is gyeran jjim (계란찜) or steamed egg casserole. You may be familiar with this dish if you are Chinese or also just Asian because this is a cheap dish that is often made by Asians on a cold day. It is simple and heart warming, what else do you need?

Today's version is going to be a bit more elaborate than the most basic form but none the less it will still be simple and delicious.

Ingredients
4 large eggs
1 1/2 cups of water
1/2 chicken stock cube
1/2 cup of spring onions, chopped finely
1/4 onion diced
1/4 zucchini, chopped
1/2 red pepper sliced
1/2 tsp salt
pinch black pepper

Method
1. Dissolve the stock cube in the water.
2. Crack the eggs into a heat safe bowl and whisk with broth.
3. Add all other ingredients and mix thoroughly.
4. Place bowl into a pot with hot water that goes half-way up. Cook over a low heat for about 15 minutes, ensuring that the water stays as a gentle simmer.
5. Sprinkle with some gochugaru if you want it to be spicy.

And there you have it, a super simple dish that is loved by all generations of Koreans and Asians
alike. It's great with it's silky smooth texture to serve with hot rice, or even as it's own.


I hope that you liked that recipe, because I never realised that I had missed such a simple but humble dish in my blogging over the years. 

I hope that you have had a great Easter, and I will try my best to keep up with posting and getting a routine going for this blog. Until then I hope that you all stay safe, healthy and most important of all happy. 

Friday, August 17, 2012

Ginger Tea 생강차 Saenggang Cha

Hey guys, so it has been a while since I last posted. Maybe you guys have finished going through my week of recipes so you have come back looking for more...hopefully. But I have finished all my school exams so I am sort of free until the actual exams that I need to to. So I'll probably be posting more for the next two months, but it also depends on whether or not I am bothered ^^

To ease my way back into blogging I am just going to be posting up a simple recipe for ginger tea 생강차 (saenggang cha) that you can make to drink anytime that you want. It will be nice to cool you down by adding a few ice cubes in, or you can just add more cold water.

Saenggang cha (생강차) is a tea made from ginger root. The ginger root is washed and sliced without peeling. The sliced ginger root is stored with honey for a few weeks. To make tea the mixed honey and ginger root is added to hot water.

Efficacy in Traditional Korean Beliefs: Some believe that Saenggang Cha is useful to prevent colds and to aid digestion. It also has a remedial effect on diarrhea and stomachache due to low body temperature. It helps someone who has a low body temperature due to bad circulation. However, neither belief has been shown in independent scientific evaluations.

This is an extremely good remedy for a sore throat and runny/blocked nose because of the ginger working wonders to the body's immune system. Although the taste may be a bit strong, it is still extremely good for your health, especially for when the days are getting chilly. Which is perfect for where I am now which has become cold again.

Ingredients
Fresh ginger – 80 g
Fresh cinnamon pieces- 20 g
Water – 8 cups
Optional - 4 to 5 pine nuts, 1 tsp of honey

Method
1. Clean the ginger well (peel the skin off as well). – I scrubbed it with rough cloth first then used a spoon to scrub off the skin
2. Rinse the cinnamon in cold water. (You don’t need to cut them into small pieces, mine was already in small pieces.)
3. Thin slice the ginger.
4. Put the ginger, cinnamon, and water into a pot.
5. Boil it on medium heat for about 25-30 minutes.
6. Sieve the ginger and cinnamon. (Use a white straining cloth if you can, to catch the small dirt from the cinnamon)
7. Serve it in a tea cup. (You can also add some pine nuts and honey)

And there you have it, a hot cup of goodness to protect you from the cold, perfect for the weather now which has returned to being cold.


So that it it from me today. I'll try my best to post another recipe again in the next few days, provided that I don't procrastinate too much. And remember that until next time to keep safe, healthy and happy!!

Sunday, August 5, 2012

Black Sesame and Rice Porridge 흑임자죽 Heugimjajuk

Hey guys, so I am already up to day three of my week long blog post challenge. I hope that you have all enjoyed the recipe so far and the Olympics as well. ^^

Today I'm going to introduce you to a traditional Korean dessert called heugimjajuk 흑임자죽. It is made from black sesame and rice, and sweet in taste. According to Oriental medicine, heugimja (black sesame) promotes health, makes hair healthy, and keeps weight off. Perfect for summer when we want to go to the beach and show off a bit.

It is also great for winter because it can help you get better, especially since it has gotten colder where I am. It is a simple dessert to make, and you can impress your guests by whipping this out because we are all so used to the sachet;s of black sesame porridge.

Ingredients
180g non-glutinous rice and 1 cup water
95g black sesame seeds and 2 cups water
900ml water
6g salt

Method
1. Wash the rice and soak in water for 2 hours, drain water on a strainer for 10min
2. Wash the black sesame and drain water on a strainer for 10 min
3. Preheat the frying pan and stir-fry sesame seeds for 40 min. on low heat, make sure to not burn the sesame. (This step helps to make the sesame fragrant)
4. Grind sesame seeds with water in a mixer for 3 min. sieve finely
5. Put the rice and water in the mixer, grind it for 2 min. and sieve
6. Put the ground rice and water in the pot, boil it on high heat for 5 min. Stir to make sure it does not clump
7. When it boils, reduce the heat to medium, cover the lid on to be steamed. Boil it for 20 min. with stirring occasionally, add ground black sesame, boil it for 5 min. more.
8. When the porridge is well-done, season with salt. Bring it to a boil once more.


And there you have it, a quick and simple dish to try summer or winter.

That conclude day three of posting, but don't forget that I will be back tomorrow. Stay healthy, happy and safe until then. And keep watching the Olympics.

Friday, August 3, 2012

Egg Bbang 계란 빵 GyeRan Bbang

Hey guys, so I am finally back after a really long break due to exams. I still haven't actually finished my exams yet, but I do have a week break in between the last two exams so I figured that I would take the time to kinda update this blog.

I'm going to try and do the same as what I did last time, where I updated every day with a new recipe. I really want to do the same this time because it pushes me to find new recipes and test them out as well.

Today I'm going to ease my way into blogging again my introducing you to something easy and simple, it still is Korean because I'm still in love with Korean food.Today I will introduce you to a simple snack called Egg Bread (계란 빵)It is practically an egg that has been set into a savoury muffin.

Egg Bbang is a much loved favourite with children and adults alike because it is so simple and yummy. anyways, to the recipe....

Ingredients
¾ Cup Flour
8 Small Eggs
2 Large Eggs (For the Batter)
½ Cup Melted Salted Butter
⅓ Cup Sugar
¼ Cup Milk
¾ tsp Baking Powder
Some Salt for Eggs
Some Melted Butter for Brushing

Method
1. Whisk 2 eggs in a mixing bowl until they are well mixed. Add the sugar and stir it until the sugar dissolves.
2. Sift the flour and baking powder into the egg mixture.
3. Add the melted salted butter and milk. Mix it well. The consistency will be like crêpe batter.
4. Put the batter in a zipper bag.
5. Use a large cup cake or muffin pan, either with oval shapes or round shapes. Brush the inside of the cup cake pan surface with melted butter evenly.
6. Put about one or two Tbsp of batter to the bottom of each pan by squeezing the bag. Make sure that the batter completely covers about ¼ inch of the bottom surface.
7. Smooth the batter surface with a spoon.
8. Break and place one egg on top of each muffin.
9. Sprinkle one generous pinch of salt onto each egg.
10. Cover the egg with rest of the batter. Leave little bit of space for the muffins to rise on the top.
11. Preheat the oven to 180C. Bake the egg bread for about 25 minutes.
12. Turn off the oven and leave the bread in the oven for 5 more minutes to finish cooking the eggs.
13. Poke the center of the bread with a tooth pick, all the way through, to check if the egg is done cooking. If the toothpick comes out clean, it is done.
NOTE: You can also add other ingredients such as bacon and herbs on top of the egg to give it more of a meal taste. This would world perfectly as a breakfast food.


And there you have it, a super simple snack to make over the weekend when you are having a break from watching the Olympics ^^

And remember I will posting all week long. Remember to stay warm, healthy and happy until next time.

Friday, July 6, 2012

Hobaktteok (호박떡)

I'm kinda in a crappy mood at the moment, and the only thing that I think can calm me down slightly is if I write up a blog post. Since I can't access my other bog for some reason, I will just post up a food blog.

The past couple of days have been cold in the morning but warmish in the afternoon so I thought that I would introduce you to a dessert that is perfect for weather like this. Hobaktteok (호박떡) is just pumpkin rice cake. This is a perfect way to enjoy the winter warmer like a dessert.

It is a pretty dessert so I guess that you can use it for special occasions by decorating it up once you have finished making it.

There isn't much to say about it so I guess that I will just move on to the recipe:

Ingredients
500 g short-grain rice powder
½ tablespoons) salt
100 g sugar
250 g sweet pumpkin (or normal pumpkin and sugar, about 50g sugar)
8 g (2 ea) jujube
8 g (16 ea) pumpkin seeds

Method
1. Scrape out the inside of the pumpkin.
2. Sprinkle salt on the rice powder and sieve.
3. Wipe the jujube with damp cotton cloths. Cut the flesh around seed and cut into flower shape. Wipe the pumpkin seeds with dry cotton cloths.
4. Boil water for steaming. Put the pumpkin, steam it for 15 minutes.
5. Scrape the flesh from the pumpkin.
6. Add pumpkin flesh and sugar into the rice powder. Mix thoroughly by rubbing, then sieve.
7. Boil water for steaming. When it boils, layer damp cotton (cheese) cloths on the bottom of the pot.
8. Put the put the mixture of rice and pumpkin into the mold, smooth the surface.
9. Make a slight criss crossing patterns with knife. Garnish with jujube and pumpkin seeds.
10. Steam for about 15 minutes.


And there you have it, quite a simple traditional Korean dessert that you can eat in Winter to warm you up.

Saturday, June 30, 2012

Bittersweet Chocolate Tart

Hey guys, so today is the first day of my two week break. There is so much that I need to get done in this time, but I haven't forgotten you. I will try to keep on posting, but it might get a bit hard. At least I have posted once in the break ^^

Today I have decided to go with something different from usual. I am going to post about a dish that is NOT Korean. I feel that I should try to expand a bit more and also be posting about other dishes.

Today it is going to be a dessert. Bittersweet chocolate tart. This is a detectable tart that you will love to have as a dessert on a winter's night. It is the perfect way to cap off a week, so do try it some time soon.

Ingredients
250g plain flour
75g unsalted butter, cubed
pinch of salt
90g of sifted icing sugar
4 tbsp full cream milk, and 55ml extra
2 egg yolks
1 cup thickened cream
200g dark bittersweet chocolate crushed
1 extra large egg, beaten
cocoa powder (garnish)

Method
Pastry
1. Place flour, butter, salt and icing sugar in a food processor and process for 20 seconds.
2. Add 55ml milk and egg yolks and process for 30 second
3. Turn dough onto a lightly floured bench and form a ball
4. Wrap in plastic and place in fridge for an hour

1. Preheat oven to 180 Celsius and butter a 28cm tart tin
2. Roll out pastry until 2cm wider than tart tin
3. Gently ease pastry into tin and then rest it in the fridge for 30 min
4. Line tart tin with foil and add rice and blind bake for 20 min.
5. Remove rice and foil and brush with the egg wash and cook for 10 min
6. remove from oven and increase oven temperature to 200 Celsius
7. Make the filling; place cream and remaining milk in a saucepan and bring to boil
8. Remove from heat and add chocolate, stirring until it is smooth
9. Strain the egg into the mixture and stir until absorbed
10. Pour warm mixture into tart shell and smooth off
11. Turn off oven, and bale for 20 min or until set
12. Allow tart to cool, then sprinkle cocoa powder and leave it out until ready to eat (DO NOT REFRIGERATE)


And that is it from me. You now have a wonderful recipe for silky smooth chocolate tart that is perfect all year around.

I will try to post more, but if I can't I really am sorry. Until the next time I post remember to take care, keep healthy and happy!!

Sunday, May 20, 2012

Kalguksu 칼국수

Hey guys, so I am returning with a post today ^^ Finally right? Well, the weather has gotten a lot colder so I just feel like eating hot foods all day long. Bye bye to cold foods. Even today, I made a batch of hotteok because I wanted to eat a hot snack food.

Anyways, today I will posting a recipe for kalguksu 칼국수, which is also known as cut noodles. The dish is made of handmade, knife-cut wheat flour noodles served in a large bowl with broth and other ingredients. It is traditionally considered a seasonal food, consumed most often in summer.

The record of kalguksucan be found in documents of the Goryeo era, but the descriptions are vague and the nature of the noodles isn't clear. In the 12th century document Goryeo dogyeong it is mentioned that noodles were only eaten on special occasions, as wheat flour was very expensive, being imported from China.

A cooking description can be found in a later document, The Best New Cooking Methods of Joseon, written in 1924. In the 1934 book Simple Joseon Cooking, the recipe calls for the noodles to be boiled and rinsed in cold water before adding broth and garnish, a method that differs from the modern version of boiling the noodles together with the broth.

Often the noodles are made with dough from wheat flour and eggs, and sometimes ground bean powder is added for texture. The dough is let to breathe, then rolled out thinly and cut in long strips. The broth for kalguksu is usually made with dried anchovies, shellfish, and kelp. Sometimes chicken broth would be used.

In order to obtain a rich flavor, the ingredients are simmered for many hours. The noodles and various vegetables, most often zucchini, potatoes, and scallions are added and boiled together. Usually seasoned with salt, the noodles are served with garnish of choice.

And now, to get to the recipe:

Noodles
Ingredients
1 cup All-purpose Flour
1/3 cup Cold Water
1/4 tsp. Salt
1 Tbsp. Oil

Method
1. Mix flour, water, salt oil to form a dough and knead for 10 minutes.
2. Wrap in plastic and let it rest for 30 minutes.
3. On a clean, floured surface, roll out the dough with a roller to a thin sheet. 4. Fold and cut with a knife.
4. Flour the cut noodles to keep each strand separated.

Broth
Ingredients
1 Tablespoon Olive Oil
1 cup Carrot, Chopped
1 whole Onion, Chopped
1 stalk Celery, Chopped
1 package Chicken Parts
6 cups Water
1 Tablespoon Salt
¼ whole Zucchini
2 whole Potatoes, Cubed
1 bunch Hand Rolled Fresh Noodles
2 Tablespoons Fresh Ground Black Pepper
2 stalks Green Onion (chopped)

Method
1. Heat your olive oil in a large soup pot. Add chopped carrot, onion and celery and cook until soft and fragrant.
2. Add 4-6 cups of water and chicken parts. Boil chicken for about 15 minutes until the meat is tender and falls off the bone.
3. Remove chicken, but continue to simmer broth. Remove meat from bones and place in a bowl for later use. Put the skin and bones back into the pot and continue to simmer for at least an hour. Add the tablespoon of salt, or season to your taste.
4. In the meantime, you can go ahead and chop up your zucchini and your potatoes.
5. Strain stock when it is ready
6. Add zucchini, potatoes and chicken.
7. Add your fresh noodles.
8. When noodles are ready add pepper and garnish.
Serve hot.


And there you have it, a hot dish that you can eat as the weather starts to turn for the cold. And best thing about it, if you can't handle spicy food this will be perfect to warm you up. Also, you can eat it when you have a cols or are feeling a bit under the weather.

Until next time, remember to keep happy, warm and healthy.