Showing posts with label snack. Show all posts

Friday, October 4, 2013

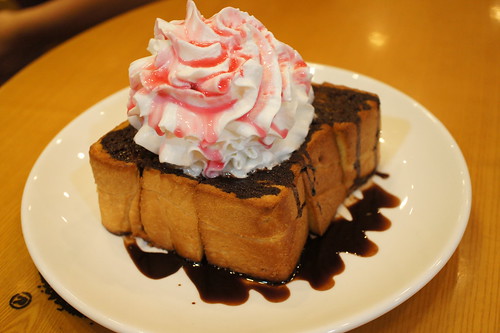
Korea Chocolate Bread 초코 버터 브레드 |Tom n Toms Style|

It's FRIDAY FRIDAY FRIDAY. It is also the last day of this blogging week :(

I'm surprised that I've been able to keep blogging for a week because so much has been happening, and I've just been so swamped and busy as well. But it's here. day 5 of recipes, and I'm really happy to share this one with you guys. Especially after  the response I got for a similar recipe I shared earlier.

I shared the Tom n Toms Honey Butter Bread a while back, so today I've come back to cap this week off with the Tom n Toms Choco Butter Bread. This one is just as indulgent, if not more because of the chocolate. And the version I share with you may be best left to group gatherings because you will drown in the richness of the dessert.

You know the drill, it's time to get started

Ingredients
5cm thick piece of white bread (white tastes best)
4 tbs butter
4 tbs nutella ot any chocolate spread
2 tbs chocolate sauce
2 tbs strawberry
1 scoop vanilla (or chocolate) ice cream or whipped cream (from a can is fine)

Method 
1. Preheat the oven to 180 C.
2. Spread butter on one side of the bread.
3. Cut the bread into 9 cubes and keep the shape of the bread.
4. Put the bread into the oven for 10 minutes or until golden brown.
5. Spread nutella on the buttered bread.
6. Place scoop of ice cream on the centre, or a generous amount of whipped cream. Top with lashings of chocolate and strawberry sauce. Serve immediately.

And there you have it, another delectable Tom n Toms creation to enjoy at home.


THAT is it. I hope that you have enjoyed my week's worth of blogs because it certainly has been fun to be sharing some of my favourite little snacks and tid-bits with you guys this week. This week I've been sharing things that I would usually deem to small or easy to make for a normal recipe, but with the nature of this weeks posts I think it has been OK.

Please do continue to scroll through all the recipes on the blog if you would like more, especially because I don't really know when I'll be back with another post :/ But please do remember to stay safe, healthy and happy. 

Wednesday, October 2, 2013

Japanese Potato Salad

I hope that everyone has been having a pleasant day so far, because it is certainly going to get bettor once I tell you about today's recipe. Unlike the other days today is going to be a bit more effort and work...only a bit more but I assure you the end product is worth it.

You may never convert back to the usual potato salad after you try this. Today I'm going to be posting about the Japanese potato salad. For those of you who may have tried this before you may know that it is a lighter and creamier version of the usual Western potato salad. It's just as delicious though and it perfect to eat as a snack in the spring or as a side dish all year round.

Unlike the usual Western potato salad being really rich and acidic the use of Japanese mayonnaise Kewpie means that the dish is kept light and more mild in terms of taste.

I really just want to share with recipe with you so let's go!

Ingredients
3 medium potatoes (any will do)
1 small carrot
1 small cucumber
1/2 brown onion
1 egg
1/2 cup Kewpie mayonnaise
salt and pepper to season

Method
1. Place washed potatoes and carrots along with the egg in a pot of salted water to boil for 10 minutes. Remove the egg after 10 minutes and continue to cook the potatoes and carrot until cooked through
2. Peel the egg and dice it up.
3. Thinly slice the cucumber, and sprinkle salt on the cucumber to dehydrate it a bit.
4. Dice the onion, not too fine though.
5. Remove carrots and potatoes when cooked through.
6. Dice the carrot and the potato with the skin on (gives it salad a wonderful flavour). Sprinkle some salt on both these and place into a bowl.
7. Squeeze the water out of the cucumber and onion and add to the bowl.
8. Add the egg and 1/2 cup of mayonnaise and mix everything together.
9. Taste and adjust with salt and pepper.

And there you have it, A simple and delightful Japanese potato salad in the comfort of your own home to enjoy all year around. It may even substitute as a lonely dinner for one on a lonely evening (we've all been there T_T)


I hope that you enjoyed that recipe today because I'm pretty sure that once you have tried this you won't want to go back to the usual potato salad. This is less dense but still so enjoyable. I hope that you've been enjoying all the posts so far because there's only 2 days left after this :(

Tuesday, October 1, 2013

Mozzarella Cheese Sticks

Hey there, I think we've had quite a few nice drinks so far so today I've decided to come up with some food food. Something that is a starter, but actual food that you can chew on. It is one of my favourite things ever, cheese sticks.

I know that not everyone is a fan of cheese, and I don't understand at all - how can you not like cheese? But anyways, these are really nice and you can always trick your non-cheese eating friends that it is fish fingers and wait for the reaction because it is HILARIOUS.

There isn't much to say about this dish other than that it is delectable, crispy on the outside and molten cheese on the inside. Feel free to choose whatever cheese you want inside, but it does work best with a soft cheese that oozes as you bite into it. I like to use mozzarella because it is my favourite, but you can use Brie or Camembert or even cheddar if you would like to.

I have nothing else to say so let's get this recipe started!

Ingredients
200g mozzarella cheese
100g flour
50g corn flour
1 large egg beaten
100g bread crumbs
oil to fry in
1/4 cup mayonnaise
1 tsp Dijon mustard
1/4 cup finely chopped herbs (parsley, tarragon or chives)
1/2 tsp garlic powder

Method
1. Preheat oil to 180C
2. Combine the flour and corn flour. Season flour with salt and pepper.
3. Cut mozzarella into 16 sticks, making sure cheese is cold
4. Dip cheese into flour, then egg, into flour again, egg again and finally breadcrumbs (this will seal everything in)
5. Lower cheese sticks into flour and fry for a few minutes until the outside is golden. Drain on paper towels a bit.
6. While cheese sticks are cooking combine mayonnaise, Dijon mustard, garlic powder and herbs in a bowl and mix.

And there you have it. The perfect finger food for a party, or even a snack for yourself on a lonely movie night in. 


I hope that you guys like today's post. I can't believe I'm already on day 4 eeeeek. Anyways stay tuned for more tomorrow :D

Sunday, September 29, 2013

Vietnamese Iced Coffee

So yesterdays post was a snack. Today's post is also gonna be a snack. I think this week might end up being a blog roll of snacks from around the world.

I hope that the caramel popcorn from yesterday was a success because I'm currently snacking on some right now. I would also be sipping some of today's recipe if it wasn't for the fact that it is 10pm and I won't be able to sleep if I had some.

As you can guess from the title of this blog post, today's recipe is going to be Vietnamese Iced Coffee. Kind of like the best drink to have ever been invented if you are looking for a serious pick me up on a swealtering hot summer's day, or even just a sweltering Spring day.

In Vietnamese the drink is known as ca phe da or cafe da. It is simple and is made with finely ground Vietnamese coffee which has a distinctive earthy flavour before being mixed with condensed milk and LOTS of ice.

The coffee was introduced to Vietnam by the French during the 19th C and condensed milk was used due to the lack of fresh milk available in the country along with a dark roast of coffee. It resulted in a strong blend of coffee that was balanced by the sweet condensed milk. Anyways to the recipe:

Ingredients
2 tbs of ground Vietnamese coffee (or dark roast coffee)
2 tbs condensed milk (can adjust to own taste)
1/2 cup boiling water
A LOT of ice cubs

Method
1. Prepare the coffee in a Vietnamese coffee filter or use a coffee machine accordingly.
2. Fill your cup with ice cubes while you wait for the coffee to drip through.
3. Pour hot coffee into the cup and then top with condensed milk.
4. Add a straw and use it to stir the condensed milk through.


And there you have it, a super simple drink to make to relieve yourself from the heat of the sun any time of the year.

I hope that you have been liking the posts so far, stay tuned for more throughout the week :)

Saturday, September 28, 2013

Caramel Popcorn

I'm going to be honest here, I'm terrible at keeping this whole blogging thing going, It's pretty much been at least a whole month since I've last posted a blog because I've just been too lazy. I'm not even going to say that it is because I've been bust. Every since mid-sem exams have finished I've just done nothing at home. Apart from catching up on lectures that I've missed (I've still got a long way to go).

But since it is now the mid-session break I'm going to strike another deal with you. My one week of non-stop posting. I'll do another one of those this week. Starting today and ending on Friday. So you'll have 7 new recipes to keep you entertained and cooking up a storm in the kitchen for like 1 month, maybe 6 if you do a recipe a week. There isn't going to be any particular theme this time, but who knows it might come out of nowhere.

So are we all OK with this deal? One week of posts starting today :)

So the first recipe for this week will be caramel popcorn. Sweet goodness that melts in your mouth, keeps your fingers sticky and reaching for more and more until you hit the bottom of the container. Unlike the usual caramel popcorn I'm going to put a slight twist on this one. Usually it is just sweet, but this time I'm going to give it an ultimate sweet and savory twist by using buttered popcorn instead of plain. Stay tuned for more.

Ingredients
1 pack of buttered microwave popcorn
1 cup brown sugar
1/4 cup light corn syrup
6 tbs unsalted butter
1/2 tsp baking soda
2 tsp vanilla essence

Method
1. Pop the popcorn according to instructions on the bag.
2. In a saucepan melt the butter and then add sugar, corn syrup and 2tbs of water. Turn to medium heat and whisk until the mixture is a golden colour.
3. Turn heat off and add the baking soda and vanilla, quickly mix in.
4. Quickly pour mix over popcorn, and try to mix as well as you can without breaking the popcorn, Doesn't matter if it isn't perfectly mixed yet.
5. Pour mixture onto a lined baking tray and place in an oven pre-heated to 120C.
6. After about 20 minutes the caramel should be movable so use a spatula to evenly coat the popcorn mix in caramel. You can repeat this every 10 minutes until the popcorn is evenly coated.
7. When the mix is evenly coated, take it out of the oven to cool before storing in an air-tight container or eating straight away.


And there you have it, a sweet and buttery snack that you can have a home ready for a movie night or just a yummy snack to have all the time.

NOTE: If you want to make salted caramel popcorn you can all 1 tsp of sea salt into the melted butter mix to give it a slight salty taste.

I hope that this recipe will be enough to keep you satisfied until tomorrow because there will be more delicious goodness in tomorrows recipe.

Stay tuned for tomorrow guys!!

Friday, August 30, 2013

Homemade CocoHodo

So I’m writing this post as I sit on the plane to go on holidays. And mannnnn it is boring. So I decided that I’d just write up another blog post, even though this post won’t be going up for a couple of days.

I hope that you guys enjoyed the last post, Tom n Toms style honey bread, I’m really craving some at the moment……… too bad I’m on a plane and not actually going to a place that has Tom n Toms.

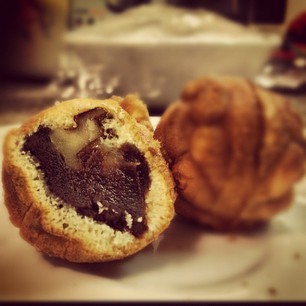
Anyways, today I’m going to be introducing you to another Korean snack food, and that is the coco hodo’s. These are little walnut pastries that are shaped like a walnut. These are particularly popular during winter when you can get them from street vendors. They are a particularly good in between meal snack to take on the go. They are quite inexpensive to buy, but it is always more fun to make your own.

To me I’d call them Korean profiteroles, although not really. It's made from a walnut pastry with a red bean filling and are AMAZING. The name is a bit deceiving when it is said in English, you sort of expect it to be made with chocolate coco = cocoa, but that might be just me.

-------------------------------------------------------------------------------
And that was all I got up to on the plane. I never actually managed to finish the post and here I am more than a month after returning finishing off the post. I'm so sorry for not posting much over the last 2 months, but I couldn't even access blogspot when I was on holidays and uni just got so overwhelming when I returned. I mean I've got exams in like 1 1/2 weeks and I and epically screwed.

Anyways, I hope that this recipe is going to satisfy your craving for new recipes and I'll try my best to put out recipes on a more regular basis. It should be quite easy once exams are over this semester. And I can't wait to share photos of the food that I ate whilst I was on holiday.

Anyways, back to today's recipe. Coco hodo. I'm pretty sure that I've covered all the introductory bases so let's move on to the recipe. I'm going to use a profiterole kinda pastry, so a choux pastry since I have no idea how to make the actual pastry, but I'll be adjusting it so it is similar in taste.

Ingredients
125 ml water
125 ml milk
100 grams butter
pinch of salt
100 grams flour
50g walnut flour (or almond meal) -- gives a nutty taste
4 eggs
1 cup red bean paste (store bought or home made)
2 tbs double cream
50g walnuts

Method
1. Heat the oven to 220ᴼC.
2. To make the pastry, melt the butter with water and milk in a large pan.
3. Bring to boiling point and tip in salt and flour. Using a wooden spoon beat hard for up to 30 seconds, till the dough no longer sticks to the sides of the pan.
4. Cool to room temperature (about 10 minutes).
5. While the dough is cooling, line 2 baking trays with baking paper.
6. When the dough has cooled beat the eggs, one at the time till the dough is smooth and glossy. Pour the dough into a pastry bag and pipe out profiteroles (about the size of a walnut) leaving enough space for them to rise, otherwise spoon with teaspoons. Tip your fingers in cold water and smooth the surface of profiteroles, as any spikes are likely to burn.
7. Bake the profiteroles in 220ᴼC for 10 minutes, then reduce to 190ᴼC and bake for another 15-20 minutes, until golden brown.
8. Using a knife poke a hole in each profiterole to let out the steam (and to fill later) and leave them to cool on a rack.
9. While the pastry is cooling prepare the red bean paste. You can adjust the sweetness of the paste to your liking and to make it extra smooth and creaming add 2 tbs of double cream.
10. Also cut the walnuts coarsely and mix it through the red bean mixture.
11. Fill a piping bag with the paste and get ready to pipe the pastry when it is sufficiently cool.
12. Fill the pastry with the hole that is at the base of the pastry.

And you are DONEEEEEEE.


This doesn't turn out to be a chewy as the original, but the pastry remains light and fluffy. It's not the easiest thing to make, but it is nice because it means you can still enjoy coco hodo even if you aren't near a store.

So I hope that you liked this recipe, and I'll try my best to post more often. Maybe in about 2 weeks time I'll have another post out. Until ten remember to stay safe, happy and healthy!!! 

Sunday, December 9, 2012

Gyeong Dan 경단

It has been a really long time since I blogged, about 2 weeks I think. I've been MIA I know, and there isn't really an explanation other than I was just not bothered. Sorry about that, but I am putting up a post today.

So today I'm going to go back to posting up Korean recipes  And today I thought that I would introduce you all to a Korean snack dessert that is similar to some of the other things that I have posted before. Today I will be posting about Gyeong Dan (경단).

Gyeongdan is a type of rice cake made by kneading glutinous rice powder with hot water, shaping the dough into balls, boiling them in hot water and coating them with various sweet powders. It gets its name because the shape is similar to round jade (gyeongdan). The color or taste varies depending on the coating powder. Sesame seeds or powder can be used to coat the balls, as well as other powders such as green tea powder and mitsugaru.

Ingredients 
5 cups glutinous rice powder
1 tsp salt
120 g water
20g  white sesame seeds
20g green tea powder
20g  black sesame seeds
28g mitsugaru powder
⅛ tsp salt
1 tsp sugar
27 g red bean
1 cup scalding water
2 cups boiling water
⅛ tsp salt
1 tsp sugar
10 cup boiling water

Method
1. Wash the red bean and drain water on a strainer for 10 min.
2. Put water and red bean in the pot, heat it up for 5 min. on high heat. When it boils, discard the boiling water and pour new water, boil it for 20 min. on medium heat.
3. Reduce the heat to low, steam it for 25 min. until the red bean very tender, pound with salt, sieve, and mix it with sugar thoroughly (52 g).
4. Add salt in the glutinous rice powder and knead with hot water. Pull off around 12~13 g of dough and roll it into 2 cm-diameter balls (total 48 ea).
5. Flatten the balls and fill them with small amounts of the red bean paste.
6. Pour water in the pot and heat it up for 9 min. on high heat. When it boils, put the rolled dough into the boiling water, boil it for about 2 min. and 30 sec.
7. When balls float up on the surface, let them float there for 20~30 sec. more. Take them out with strainer, quickly rinse in cold water and drain.
8. Divide rice-cake balls into 5 parts and coat the balls with each coating.

And there you have it, a Korean dessert that you can pack as a snack when you are going out or you can place it up on a plate nicely and serve it when you have guests over. It is not overly sweet and the coating of the gyeong dan makes all the difference to the dish.


I hope that you like this recipe because it is quite nice to have around the house for when you have guests because you can make it really pretty. 

Anyways I hope that you have enjoyed this blog post, I'll try and blog again soon. And until next time I hope that you all stay safe, happy and healthy. 


Thursday, November 15, 2012

Bbopki 뽑기

Hey guys, I seem to be taking more than a week to upload a new blog post these days. I'm really sorry but the time kinda just blurs now because I no longer have to go to school or do anything really. But I am back with a new post today ^^

I think I will be posting about a sweet recipe today. It isn't really a dessert but more of a snack.... You may have seen it before if you have watched Family Outing (I know it is super old, but it is so nice)

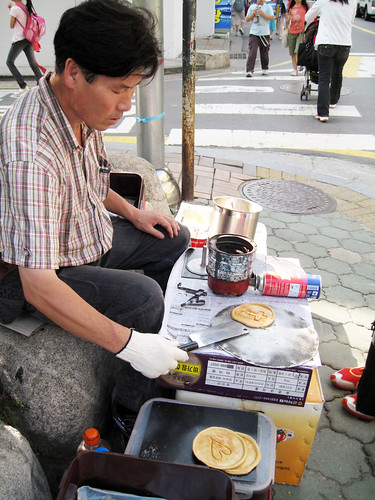
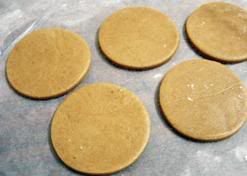
It is a traditional Korean candy made of carmelised sugar and a pinch of baking soda, bbopki (뽑기) is usually formed into round disks or molded onto a stick as a lollipop. You can find it at food stalls on streets, but honestly it is so simple there is no need for it.


Usually you will just see the vendor making bbopki sitting over a hot plate on a table. Many bbopki vendors stamp the candy with a design or shape, and if you manage to eat around the shape without breaking it, then you can get another bbopki for free (you can watch the EatYourKimchi video with bbopki in it too) The candy tastes like a slightly burnt campfire marshmallow, and it's very sweet.

It is a super simple recipe so I will probably post something tomorrow as well. But here we go -->:

Ingredients
Sugar
Baking soda

Utensils
Foil
Metallic scoop (it will get burnt so set one aside for this)

Method
1) Add a desired amount of sugar to scooping thing. Just don't have so much that when you stir the sugar it over flows. I usually go for 2 table spoons.
2) Place the foil sheet on a table.
3) Turn on your stove.
4) Place the scoop above the flame to let the sugar heat up.
5) Stir the sugar with a wooden chopstick as the sugar begins the melt turning into caramel.
6) When the sugar has completely melted into pure liquid (but is not burn) get a pinch of baking soda and add it to the sugar liquid.
7) Place the scoop back on to the fire and stir the liquid.
8) Stir as you see that the liquid starts to become the color of a caramel.
9) Take the scoop off of flame and quickly pour the substance on the foil.
10) You can now make it into a lollipop or a flat piece of candy.
11) To make a lollipop you can place a paddlepop stick inside the bbopki
12) To make flat bbopki place another piece of foil above the bbopki and flatten it (but not too flat,let it be about 3mm)
13) Wait until bbopki is hard enough to remove from foil

And there you have it, a sugar dessert that is just glorified caramel.


I hope that this will be a fun yet quick recipe that you will want to try out. It is one of the most simple snacks ever, but I guess there will always be the risk of burning your caramel, but remember that practice makes perfect.

That is it from me today, but like I said above I will try and post another recipe post tomorrow because this one was so simple. Until then remember to stay happy, healthy and safe.

Monday, August 6, 2012

Korean Doughnut 꽈배기 도너츠 KkwaBaeGi DoNeoCheu

Hey, so I'm back with the fourth recipe in the blogging week ^^ I'm already hald-way through the week.. Eeek.

Today I'm going to introduce you to doughnuts. No, not the ordinary cinnamon ones that you get but the Korean version (꽈배기 도너츠 or KkwaBaeGi DoNeoCheu). It is a similar version of Korean doughnuts that you can buy at street vendors, but from the comfort of your own home. There isn't much to say about the recipe so I will get straight to it.

Ingredients
3 Cups All Purpose Flour
1 Cup Water
1 Egg
4 Tbsp Sugar
5 Tbsp Butter
1½ Tbsp Yeast
1 tsp Salt
Sugar for Coating
Oil for Deep Frying

Method
1. In a large mixing bowl, add 3 cups of all purpose flour, 4 Tbsp of sugar, 5 Tbsp of butter, 1½ Tbsp of yeast, and 1 tsp of salt. Mix everything together to make the butter crumble.
2. Add 1 egg and 1 cup of lukewarm water.
3. Knead the dough for least 15 minutes until it becomes elastic.
4. Form the dough in to a ball. Cover it with plastic wrap.
5. Let it rise for about 1 hour in a slightly warm place until the dough size doubles. If it is at room temperature, it will take more than an hour.
6. Divide the dough into 16 to 24 pieces. Round each piece to make a ball.
7. Roll a ball of the dough out to about 12 inches in length. While you are rolling it, twist each end in the opposite direction so that the dough will become twisted when you release the tension.
8. Let the dough wrap around itself to form the twisted shape.
9. Set it aside for about 10 minutes to rise again.
10. Meanwhile, heat the oil on medium-high. When you drop a piece of dough in the oil and it rises in about 2 seconds, the temperature for the oil is right.
11. Fry the donuts. When one side of a doughnut becomes golden brown, flip it over.
12. Only flip it over once. If you flip it often, then the doughnut will become too greasy.
13. After frying the donuts, cool them for about 5 minutes. In a plastic bag, add some sugar and a couple of the cooled donuts. Shake them.


And there you have it, your own homemade Korean style doughnuts to enjoy as a snack for the kids or for yourself.

Remember to check back tomorrow because there will be a new recipe. Until then keep warm, happy and healthy.

Friday, August 3, 2012

Egg Bbang 계란 빵 GyeRan Bbang

Hey guys, so I am finally back after a really long break due to exams. I still haven't actually finished my exams yet, but I do have a week break in between the last two exams so I figured that I would take the time to kinda update this blog.

I'm going to try and do the same as what I did last time, where I updated every day with a new recipe. I really want to do the same this time because it pushes me to find new recipes and test them out as well.

Today I'm going to ease my way into blogging again my introducing you to something easy and simple, it still is Korean because I'm still in love with Korean food.Today I will introduce you to a simple snack called Egg Bread (계란 빵)It is practically an egg that has been set into a savoury muffin.

Egg Bbang is a much loved favourite with children and adults alike because it is so simple and yummy. anyways, to the recipe....

Ingredients
¾ Cup Flour
8 Small Eggs
2 Large Eggs (For the Batter)
½ Cup Melted Salted Butter
⅓ Cup Sugar
¼ Cup Milk
¾ tsp Baking Powder
Some Salt for Eggs
Some Melted Butter for Brushing

Method
1. Whisk 2 eggs in a mixing bowl until they are well mixed. Add the sugar and stir it until the sugar dissolves.
2. Sift the flour and baking powder into the egg mixture.
3. Add the melted salted butter and milk. Mix it well. The consistency will be like crêpe batter.
4. Put the batter in a zipper bag.
5. Use a large cup cake or muffin pan, either with oval shapes or round shapes. Brush the inside of the cup cake pan surface with melted butter evenly.
6. Put about one or two Tbsp of batter to the bottom of each pan by squeezing the bag. Make sure that the batter completely covers about ¼ inch of the bottom surface.
7. Smooth the batter surface with a spoon.
8. Break and place one egg on top of each muffin.
9. Sprinkle one generous pinch of salt onto each egg.
10. Cover the egg with rest of the batter. Leave little bit of space for the muffins to rise on the top.
11. Preheat the oven to 180C. Bake the egg bread for about 25 minutes.
12. Turn off the oven and leave the bread in the oven for 5 more minutes to finish cooking the eggs.
13. Poke the center of the bread with a tooth pick, all the way through, to check if the egg is done cooking. If the toothpick comes out clean, it is done.
NOTE: You can also add other ingredients such as bacon and herbs on top of the egg to give it more of a meal taste. This would world perfectly as a breakfast food.


And there you have it, a super simple snack to make over the weekend when you are having a break from watching the Olympics ^^

And remember I will posting all week long. Remember to stay warm, healthy and happy until next time.