Showing posts with label red bean. Show all posts

Friday, August 30, 2013

Homemade CocoHodo

So I’m writing this post as I sit on the plane to go on holidays. And mannnnn it is boring. So I decided that I’d just write up another blog post, even though this post won’t be going up for a couple of days.

I hope that you guys enjoyed the last post, Tom n Toms style honey bread, I’m really craving some at the moment……… too bad I’m on a plane and not actually going to a place that has Tom n Toms.

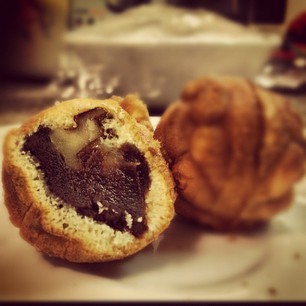
Anyways, today I’m going to be introducing you to another Korean snack food, and that is the coco hodo’s. These are little walnut pastries that are shaped like a walnut. These are particularly popular during winter when you can get them from street vendors. They are a particularly good in between meal snack to take on the go. They are quite inexpensive to buy, but it is always more fun to make your own.

To me I’d call them Korean profiteroles, although not really. It's made from a walnut pastry with a red bean filling and are AMAZING. The name is a bit deceiving when it is said in English, you sort of expect it to be made with chocolate coco = cocoa, but that might be just me.

-------------------------------------------------------------------------------
And that was all I got up to on the plane. I never actually managed to finish the post and here I am more than a month after returning finishing off the post. I'm so sorry for not posting much over the last 2 months, but I couldn't even access blogspot when I was on holidays and uni just got so overwhelming when I returned. I mean I've got exams in like 1 1/2 weeks and I and epically screwed.

Anyways, I hope that this recipe is going to satisfy your craving for new recipes and I'll try my best to put out recipes on a more regular basis. It should be quite easy once exams are over this semester. And I can't wait to share photos of the food that I ate whilst I was on holiday.

Anyways, back to today's recipe. Coco hodo. I'm pretty sure that I've covered all the introductory bases so let's move on to the recipe. I'm going to use a profiterole kinda pastry, so a choux pastry since I have no idea how to make the actual pastry, but I'll be adjusting it so it is similar in taste.

Ingredients
125 ml water
125 ml milk
100 grams butter
pinch of salt
100 grams flour
50g walnut flour (or almond meal) -- gives a nutty taste
4 eggs
1 cup red bean paste (store bought or home made)
2 tbs double cream
50g walnuts

Method
1. Heat the oven to 220ᴼC.
2. To make the pastry, melt the butter with water and milk in a large pan.
3. Bring to boiling point and tip in salt and flour. Using a wooden spoon beat hard for up to 30 seconds, till the dough no longer sticks to the sides of the pan.
4. Cool to room temperature (about 10 minutes).
5. While the dough is cooling, line 2 baking trays with baking paper.
6. When the dough has cooled beat the eggs, one at the time till the dough is smooth and glossy. Pour the dough into a pastry bag and pipe out profiteroles (about the size of a walnut) leaving enough space for them to rise, otherwise spoon with teaspoons. Tip your fingers in cold water and smooth the surface of profiteroles, as any spikes are likely to burn.
7. Bake the profiteroles in 220ᴼC for 10 minutes, then reduce to 190ᴼC and bake for another 15-20 minutes, until golden brown.
8. Using a knife poke a hole in each profiterole to let out the steam (and to fill later) and leave them to cool on a rack.
9. While the pastry is cooling prepare the red bean paste. You can adjust the sweetness of the paste to your liking and to make it extra smooth and creaming add 2 tbs of double cream.
10. Also cut the walnuts coarsely and mix it through the red bean mixture.
11. Fill a piping bag with the paste and get ready to pipe the pastry when it is sufficiently cool.
12. Fill the pastry with the hole that is at the base of the pastry.

And you are DONEEEEEEE.


This doesn't turn out to be a chewy as the original, but the pastry remains light and fluffy. It's not the easiest thing to make, but it is nice because it means you can still enjoy coco hodo even if you aren't near a store.

So I hope that you liked this recipe, and I'll try my best to post more often. Maybe in about 2 weeks time I'll have another post out. Until ten remember to stay safe, happy and healthy!!! 
Saturday, February 16, 2013

Korean Red Bean Doughnut 풀빵 Pul bbang

Hey guys, so today is the last day of my blog spectacular that involved desserts such as apple crumble and japgwapyon and Valentine's Day specials such as breakfast smoothies, a tandoori chicken salad entree, pesto chicken kiev main and a creme brulee panna cotta dessert. So please do check out those other posts from this week.

Today is the last day of my blog week, and I have enjoyed it like I always do. I really do need to blog more often, it is a nice was to de-stress and get creative but I have a slight issue with procrastination...ok it's a pretty big issue, but I'm working on it.

To top off the week I'm going to be introducing you to another Korean dessert, as I had promised yesterday. Pul bbang (풀빵) is a Korean pancake dumpling, usually stuffed with sweetened red bean paste (팥 앙금, patanggeum). You could call them Korean filled doughnuts.

The Japanese have their own version of pul-bbang, called takoyaki. It is stuffed with boiled, chopped octopus. Takoyaki batter also is savory and other than the shape I don't really see a resemblance between the two.

Pul-bbang is sold on the street in most major Korean cities. But they're more difficult to find than their more famous cousins, boong-uh-bbang (붕어빵),which are a red bean–stuffed bread shaped like a fish.

I think that is enough for the history of the bread, it is about time that I get started in the recipe.

Ingredients
1 cup rice flour
1/4 teaspoon salt
2 eggs, beaten
1 teaspoon baking powder
1 cup milk
1 cup sweetened red bean paste (the stuff from the can will do fine)

Method
1. Mix all the ingredients for the batter until smooth.
2. Set a round doughnut pan on medium heat. HINT: you can put your doughnut maker to use or you can use a small cupcake tin in the oven)
3. Place approximately 1 tablespoon of batter into each well of the pan. I used a two spoon technique to scrape and drop the red bean paste into the batter.
4. After you have filled all the wells with batter, immediately start placing the 1/2 teaspoon of the filling e in the middle.
5. Add another tablespoon or so of batter to the top to cover the filling.
6. Let the dumplings cook for a couple of minutes.
7. Turn each dumpling over after you notice bubbles in the batter and slight pulling away on the edges.
8. Cook for a few minutes more on the other side. From there, you can flip them alternating until they are golden brown on both sides.

And there you have it, a delectable Korean dessert that is sure to please all ages, from young kinds to the oldies.


I hope that you all found that as a fitting way to end the blogging week. I will be back soon with more recipes, Korean to clarify for those of you wanting more Korean recipes. 

I hope that you all enjoy your weekend and until next time remember to stay safe, healthy and most important of all happy. 

Sunday, October 30, 2011

Red Bean Ice-Cream 팥 아이스크림

Hey guys...I'm back again this week, and I'm not in a rush this time so....it might be a long-ish post. Probably not because I have only had enough time to prepare one recipe..... >.<

Anyways, I am finally doing a Korean recipe again. It has been so long, it must have been like what....a month since my last Korean recipe?

Recently it has been really warm in Australia...so I'm going to introduce to you guys a refreshing Korean dessert...ok, is isn't really all that Korean. You can say that it is a fusion Korean and Western take on something that we all like to eat, sans those who are lactose intolerant.

So I'm going to show you guys how to make Red Bean Ice-Cream. It is pretty simple and there are two ways of making it..one is a cheat's way and the other....not a cheats way I guess.

There really isn't any history lesson for this dessert because it is a fusion thing...and you can pretty much guess from the title. It is just red bean flavoured ice-cream.

To get started....the not cheats way first

Ingredients
2 Cup Red Bean Paste
2 Cup Whipping Cream
1 Cup Milk
8 Tbsp Sugar <-- to be adjusted to your liking

Method
1. Combine all of the ingredients in a mixing bowl
2. Combine the mixture until it is smooth
3. Pour the mixture into popsicle moulds
4. Let it harden over 6 hours
5. Take it out and enjoy!!!


You may find that it is a bit harder compared to normal ice cream, but that is normal. If you try the cheats way it should be considerably more
soft.
Cheats way

Ingredients

2 Cup Red Bean Paste

1 L of Vanilla ice-cream
sugar to adjust to your liking

Method
1. Combine all of the ingredients in a mixing bowl
2. Combine the mixture until it is smooth
3. Pour the mixture into popsicle moulds
4. Let it harden over 6 hours
5. Take it out and enjoy!!!


Ok, so there you have it, two ways to make red bean ice cream. Two recipes, the same result and pretty much the same work. you can choose which one you can to use. If you are wanting to get even more fancy inc-cream I suggest you use the first recipe and an ice-cream mixture to get a proper ice-cream result.

Anyways, like I said. There you have it a refreshing Korean dessert to eat as you tackle the hot and humid Australian weather at the moment. I know that it is starting to get cold in Korea....so it is a bit weird to be posting a summer dessert now. But I will try to post something for the Korean readers in the coming week.

That is it from me today...and I will be back soon ^^