Showing posts with label warm. Show all posts

Wednesday, June 26, 2013

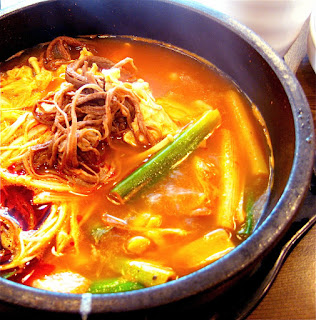
육개장 YukGaeJang

Heyyyy dere sexy peoples.

It's been a really long time since I have posted a blog :/ I have been busy with finals for uni and completing assignments so there hasn't been any post for a really long time :( BUT I finished all of my exams yesterday, so I'm not back with a recipe. I'm going to be on break until August so I'll probably try and do a post a week, possible more sometimes.

I hope that you have all been well ~~~

Let's see how we are going in terms of seasons, it's now summer in Korea, so we probably want some summer food right? Even though it is not the hottest time of the year just yet, this dish can still be something that you can enjoy to help cool you down. And it is also great for the colder countries in the southern hemisphere where it is winter at the moment,

The dish for today is called yukgaejang (육개장). It is a spicy soup-like dish that is made with beef and scallions as well as other ingredients such as bean sprouts (kong namuel), bracken, taro stem, onion and dangmyeon (sweet potato noodles). It is usually served with rice and kimchi.

The dish can also be made using chicken, and in that case it could be called dak yukgaejang.

This is a hot spicy dish so you may be confused about why it would be eaten in the summer. Western cultures tend to eat cold foods to cool down in the summer, this cools you down from the inside. However in Korea, they also like to cool themselves down from the outside by eating hot spicy foods to sweat more and thus also be cooled that way.

Ingredients
600g beef brisket
1 small onion
100g bean sprouts
50g taro stem (found dried in Asian marts)
50g bracken (found dried in Asian marts)
3 green onions
1/2 korean radish
3 tbs chilli flakes (gochugaru)
2 tbs minced garlic
3tbs soy sauce
60ml sesame oil
60ml vegetable oil
3tbs salt
1tbs pepper
4L water

Method
1. Soak the taro stem and bracken in warm water for an hour.
2. In a large pot add beef, onion, green onions and all the water. Boil it for 30min on a medium heat with the lid on.
3. Blanch the soaked taro stems and bracken in water for about 10 minutes. Squeeze all the water out and then cut into 10cm pieces.
4. Cut the radish into 1cm pieces
5. Remove the cooked beef from the broth and let it cool for 30 min. After that, tear the beef into small strips.
6. In a bowl mix half the chilli flakes, with 3 tbs sesame oil, soy sauce, garlic, 1tbs salt and the pepper. If you want you can add more chilli flakes.
7. Add the bracken, taro stem and meat in a bowl with half of the sauce and let it sit for 10 minutes.
8. Add the sauce mixture into the broth with the radish and boil it for 40min on a medium heat.
9. In a small pot add all the remaining oil and chilli flakes and stir fry for 2 minutes, constantly stirring to prevent burning.
10. Strain the chilli oil through a cheesecloth.
11. Add some more green onions, bean sprouts, rest of the spicy sauce and chilli oil to the broth and salt to season. Boil for another 10 minutes.
12. Serve with rice and kimchi.

And there you have it, a nutritious dish to eat in summer or winter to cool you down or to warm you up. Either way it is bound to satisfy you.


I hope that you like that dish because it is certainly what I'm going to have for dinner tonight as it is super-duper cold and rainy at the moment. Have a try of it when it is super hot or cold and you will feel the heat of the dish radiate throughout the rest of your body.

I'm going to post more in the coming days, and until then remember to keep warm, safe, healthy and happy!
Sunday, May 5, 2013

Cookbook and Apple and Rhubarb Cake

Hey everyone, it has been so long since I've last posted a recipe and I'm really sorry about that but I've had exams. The exams are now over so I'll be posting a recipe tonight. But before I do that I have some very big news to share with you all.

I actually submitted one of the recipes on this blog for a cookbook competition at my university and it happened to get accepted. So it seems that one of my recipes is now going to be published into a cookbook. For those of you that are wondering the recipe was the one for the Gyeran Bbang, it's simple, cheap, delicious and perfect for a student like me. There was a photo shoot and all that jazz, and they are even going to film the recipe so you can also watch a video of it. There is going to be a book launch and everything, so I'm super proud about this and I'm so happy to finally be able to share it with all of you! If you haven't seen that recipe before do have a look at it, it's super scrumptious.

Now to move on to the blog for today. today's post is going to be a simple feel good dessert. It is starting to get cold here, as we start May so I thought what's better than a good old apple and rhubarb crumble. Only today I'm going to change it up a bit and convert it to a cake.

Apple and rhubarb cakes are wholesome and warm and are the perfect thing to keep you going on a cold night, or even as the spring approaches because that's technically the rhubarb season. A bit of custard or ice-cream on the side and you have the perfect dessert.

Ingredients
60 g soft unsalted butter
380g brown sugar
2 eggs
1 tsp vanilla extract
300g plain flour
1 tsp sodium bicarbonate
2 tsp ground cinnamon
1/2 tsp ground nutmeg
1/2 tsp ground allspice
1 cup sour cream
grated rind of 1 lemon
250g chopped rhubarb
250g chopped apples
80g brown sugar, extra
1tsp ground cinnamon, extra
Custard or ice-cream to serve

Method
1. Mix butter and sugar in processor until blended.
2. Add one egg at a time, mixing well between additions.
3. Add vanilla extract and mix well. Sift flour, spices and sodium bicarbonate together.
4. Fold into egg mixture alternatively with combined sour cream and lemon rind.
5. Fold rhubarb and apple in using a wooden spoon.
6. Spoon mixture into a 23cm spring form pan lined with baking paper on bottom and sides.
7. Combine extra brown sugar and cinnamon and sprinkle over cake.
8. Bake at 175C for about 1 hour and 50 minutes, or until cooked when tested with a skewer.
9. Cool in pan.
10. Cut and serve with a scoop of ice-cream or a generous amount of warm custard.


And here is the recipe for my version of an apple and rhubarb cake. I hope that you guys enjoy it, enjoy the weather and the fresh foods that are available at this time of the year, it is usually one of the best. 

I'll try and post more recipes up, until I have my final exams at least....so until the next post have fun, enjoy the sun but remember to stay healthy, safe and happy! 

Monday, February 11, 2013

Valentines Day Warm Tandoori Chicken Salad

Hey guys, so I'm back with day 2 of my Valentines Day weekly lead up. I'm pretty happy with myself for even actually being bothered to blog, I have been really lazy over the last month.

So I have decided that I will continue with the Valentines day theme and today I am going to post up an entree, tomorrow will be a main and then on the 14th I will be posting up a dessert, So that you will have a three course meal at your disposal for use on Valentines day with your SO. Maybe next year I should start this earlier....

Anyways, today I'm going to show you guys how to make a Warm Tandoori Chicken Salad. I had one of these at a formal dinner once (not for Valentines Day though, I haven't had the privileged of being to one of those just yet) and it was absolutely AMAZING.

With Sydney cooling down for the week and the rest of the world caught up in a cold snap, Nemo anyone? I thought that it would be a good idea to have something warm as a starter, just so you aren't shivering until the main meal.

This may seem like a really difficult dish to make but there isn't much to it, it is super simple and I am quite proud of it because it is something that I have made up entirely by myself.

I guess we should get started with the recipe:

Ingredients
2 chicken breasts
1/4 cup tandoori curry paste
50g natural greek yogurt
1 T olive oil
Salad
1 cos lettuce
1 red onion
100g spinach leaves
1 cucumber
1 tomato
1/2 carrot
Parmesan Cheese
Dressing
Juice of 1 lime
2 T olive oil
1 T brown sugar
pinch of paprika
Salt and pepper

Method
1. Cut the chicken into strip
2. Marinate the chicken in the tandoori sauce, yogurt and oil for an hour before cooking
3. Whilst the chicken is marinating prepare the salad. Place a couple of leaves of cos lettuce on each plate and top with a bit of the spinach. Cut the onion, tomato and cucumber into slices and arrange those on top too. Grate the carrot and sprinkle on top.
4. Heat up a pan and drizzle with a bit of oil before placing the chicken in and cooking until it is done and slightly crispy.
5. Arrange the chicken on top of the salad whilst still hot.
6. Shave a bit of parmesan on top of the chicken.
7. Quickly mix the dressing ingredients before drizzling on top of everything right before serving,

And there you have it, a warm tandoori chicken salad that is bound to impress as an entree for Valentines Day or any other day of the year for that matter.


I hope that this entree will impress your date for the night, and please to do come back tomorrow because I will be posting up a recipe for the main course. 

Until tomorrow keep on looking for your Valentine because I'm sure they are out there somewhere otherwise search my site for some other comfort food.