Showing posts with label rice. Show all posts

Wednesday, June 26, 2013

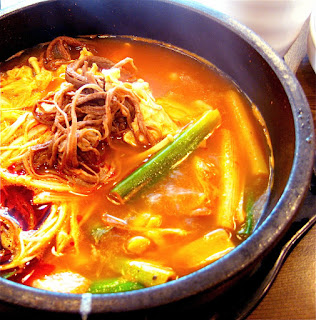
육개장 YukGaeJang

Heyyyy dere sexy peoples.

It's been a really long time since I have posted a blog :/ I have been busy with finals for uni and completing assignments so there hasn't been any post for a really long time :( BUT I finished all of my exams yesterday, so I'm not back with a recipe. I'm going to be on break until August so I'll probably try and do a post a week, possible more sometimes.

I hope that you have all been well ~~~

Let's see how we are going in terms of seasons, it's now summer in Korea, so we probably want some summer food right? Even though it is not the hottest time of the year just yet, this dish can still be something that you can enjoy to help cool you down. And it is also great for the colder countries in the southern hemisphere where it is winter at the moment,

The dish for today is called yukgaejang (육개장). It is a spicy soup-like dish that is made with beef and scallions as well as other ingredients such as bean sprouts (kong namuel), bracken, taro stem, onion and dangmyeon (sweet potato noodles). It is usually served with rice and kimchi.

The dish can also be made using chicken, and in that case it could be called dak yukgaejang.

This is a hot spicy dish so you may be confused about why it would be eaten in the summer. Western cultures tend to eat cold foods to cool down in the summer, this cools you down from the inside. However in Korea, they also like to cool themselves down from the outside by eating hot spicy foods to sweat more and thus also be cooled that way.

Ingredients
600g beef brisket
1 small onion
100g bean sprouts
50g taro stem (found dried in Asian marts)
50g bracken (found dried in Asian marts)
3 green onions
1/2 korean radish
3 tbs chilli flakes (gochugaru)
2 tbs minced garlic
3tbs soy sauce
60ml sesame oil
60ml vegetable oil
3tbs salt
1tbs pepper
4L water

Method
1. Soak the taro stem and bracken in warm water for an hour.
2. In a large pot add beef, onion, green onions and all the water. Boil it for 30min on a medium heat with the lid on.
3. Blanch the soaked taro stems and bracken in water for about 10 minutes. Squeeze all the water out and then cut into 10cm pieces.
4. Cut the radish into 1cm pieces
5. Remove the cooked beef from the broth and let it cool for 30 min. After that, tear the beef into small strips.
6. In a bowl mix half the chilli flakes, with 3 tbs sesame oil, soy sauce, garlic, 1tbs salt and the pepper. If you want you can add more chilli flakes.
7. Add the bracken, taro stem and meat in a bowl with half of the sauce and let it sit for 10 minutes.
8. Add the sauce mixture into the broth with the radish and boil it for 40min on a medium heat.
9. In a small pot add all the remaining oil and chilli flakes and stir fry for 2 minutes, constantly stirring to prevent burning.
10. Strain the chilli oil through a cheesecloth.
11. Add some more green onions, bean sprouts, rest of the spicy sauce and chilli oil to the broth and salt to season. Boil for another 10 minutes.
12. Serve with rice and kimchi.

And there you have it, a nutritious dish to eat in summer or winter to cool you down or to warm you up. Either way it is bound to satisfy you.


I hope that you like that dish because it is certainly what I'm going to have for dinner tonight as it is super-duper cold and rainy at the moment. Have a try of it when it is super hot or cold and you will feel the heat of the dish radiate throughout the rest of your body.

I'm going to post more in the coming days, and until then remember to keep warm, safe, healthy and happy!
Friday, April 5, 2013

Steamed Egg Casserole 계란찜 Gyeran Jjim

It has been a REALLY LONG TIME SINCE I'VE LAST POSTED.

I didn't realise just how long it had been until earlier this week when I checked this blog. I am so sorry for not posting for so long, I've been juggling uni and work and just trying to find my footing as there are so many things going on.

Hopefully I'll be able to get into a regular schedule with these recipe posts once I've got everything sorted out.

To make up for not posting I'd like to tell you all that I managed to have over 1000 hits on my blog in the month of March, which was AMAZING because I didn't even post a recipe up. Thank you guys so much. You're what keeps me going.

And today I'm going to be sharing a simple recipe; nothing too fancy but comfort food. It's getting a bit colder in Sydney these day, especially over the past week so this will be a dish that is ready to warm you up.

Today's recipe is gyeran jjim (계란찜) or steamed egg casserole. You may be familiar with this dish if you are Chinese or also just Asian because this is a cheap dish that is often made by Asians on a cold day. It is simple and heart warming, what else do you need?

Today's version is going to be a bit more elaborate than the most basic form but none the less it will still be simple and delicious.

Ingredients
4 large eggs
1 1/2 cups of water
1/2 chicken stock cube
1/2 cup of spring onions, chopped finely
1/4 onion diced
1/4 zucchini, chopped
1/2 red pepper sliced
1/2 tsp salt
pinch black pepper

Method
1. Dissolve the stock cube in the water.
2. Crack the eggs into a heat safe bowl and whisk with broth.
3. Add all other ingredients and mix thoroughly.
4. Place bowl into a pot with hot water that goes half-way up. Cook over a low heat for about 15 minutes, ensuring that the water stays as a gentle simmer.
5. Sprinkle with some gochugaru if you want it to be spicy.

And there you have it, a super simple dish that is loved by all generations of Koreans and Asians
alike. It's great with it's silky smooth texture to serve with hot rice, or even as it's own.


I hope that you liked that recipe, because I never realised that I had missed such a simple but humble dish in my blogging over the years. 

I hope that you have had a great Easter, and I will try my best to keep up with posting and getting a routine going for this blog. Until then I hope that you all stay safe, healthy and most important of all happy. 

Friday, August 24, 2012

Sweet Rice Dessert 약식 Yaksik

Hey guys, so I'm back with a recipe this week. School has been getting more hectic since there is so much that I still need to so before I graduate. Anyways to get my mind off all of that I'm going to post a quick blog post today.

Today I will be introducing you to a traditional Korean dessert that is thought to have slightly medicinal properties because of it's ingredients. The dish is called Yaksik 약식. It is a sweet Korean dish made by steaming glutinous rice, and mixing with chestnuts, jujubes, and pine nuts. It is seasoned with honey or brown sugar, sesame oil, soy sauce, and sometimes cinnamon.

Traditionally it is eaten on Jeongwol Daeboreum (정월대보름), a Korean holiday which falls on every 15 January in the lunar calendar, but also for weddings and hwangap festivities. But it is still really nice to have all year around, why wait for the festivities?

Yaksik got its name due to the use of honey in its ingredients. According to the etymology book Ah'un Gakbi (hangul:아언각비, hanja:雅言覺非) written in early 19th century Joseon, it is noted that honey was commonly called as yak (medicine). Thus honey buckwheat wine was called yakju (약주), honey rice was called yakban (약반, old word for yaksik), and fried honey ricecake was called yakgwa (약과).

Records of yaksik date back to Samguk Yusa, written in the 13th century. Legend says that King Soji of Silla headed on a journey on the 15th of January, when a crow alerted him of danger. The King saved himself from a potential revolt thanks to the crow's warning and the day of January 15 was designated as a day of remembrance thereafter. Glutinous rice was put up as an offering during the commemorative rites, which became the origin of yaksik.

The adding of pine nuts, chestnuts, red dates, honey, and oil were added in the Goryeo era. Yaksik is also mentioned in various books from the Joseon period such as Dongguk Sesigi(동국세시기), Yeolyang Seisigi(열양세시기), Dong'guk Yeoji Seungram (동국여지승람). In Yeolyang Seisigi, it is said that envoys to China shared yaksik with the people in Yeonkyung, and most enjoyed the dish.

It's has been a while since I have done a history post of the dishes that I am going to post about, but I think I can get used to it....

And now, to move on to the recipe. There is a bit of work involved but the reward is much greater.

Ingredients
4 C sweet rice
2 C water
(1 1/3 to 1 1/2 C sugar + 3 T honey) OR (1 1/2 C dark brown sugar)
4 T soy sauce
4 T sesame oil
1/2 tsp salt
1 tsp cinnamon powder (optional)
1 1/2 C peeled chestnuts (uncooked and it can be from a can or fresh)
1 C dried jujubes (aka dried red dates)
2 T pine nuts

You need: a pressure cooker (pressure rice cooker works best), 8×8 cake pan or 12 or more cupcake liners or remekins.

Method
1. Measure the sweet rice and soak in cold water for 1 hour (soak 5 hours if you are cooking in the microwave instead of a pressure cooker).
2. Measure and prepare the pine nuts, chestnuts and jujubes. Drain the syrup from the canned chestnuts and set aside. Canned chestnuts work best but you can also use uncooked peeled chestnuts.
3. Wash the dried jujubes, making sure the dust in between the wrinkles are completely washed away. Dry them with a towel. If they are seeded, cut around the seed. If they are seedless, one less thing to do! Cut the flesh into small squares (1/2 inch) or strips.
4. Save the seeds and make some jujube water by boiling and then simmering the seeds in 2 cups of water for 10 min. Now you have jujube tea (대추차 daechucha) which you can drink with some honey and also use some to cook the rice later. Jujube water adds much more flavor.
5. After the sweet rice has soaked for an hour, drain the water from the rice. Cook the rice in a pressure rice cooker by adding 2 C of water (use 1/2 C of the jujube water from step 2 if you can) and follow the instructions for cooking regular white rice. If you don’t have a pressure cooker, you can cook the rice in the microwave – add about 1 C of water and cook on high for 10 minutes.
6. When the rice is cooked (the rice will be very sticky but should not be too mushy), add the sugar, soy sauce, sesame oil, salt and cinnamon powder. Mix the rice well but not too much because it will become too starchy. Stir only until the rice is evenly seasoned.
7. Add the jujubes, chestnuts and pine nuts. Fold them into the rice.
8. Put everything back in the pressure cooker and if you have a ‘steam’ option, steam for 20 minutes. If you don’t have a ‘steam’ option, just choose the shortest rice cook time and cook it again.
9. You are ready to serve Yaksik now. Fill a 8×8 cake pan with the Yaksik and let it cool. Once it’s cool to touch, cover it to keep it from drying. Cut it into small squares or 2/3 in thick slices and serve. Again, when it’s cooled, cover with some plastic wrap.

And there you have it a delicious traditional Korean dessert that you can attempt to make this weekend. But I will warn you that it requires a lot of time, so maybe plan ahead which weekend you want to try the dish out.


So that is it from me this week. I hope that you all stay happy, healthy and safe until I post again next time.

Tuesday, March 20, 2012

Fist Rice 주먹밥 (Jumeok Bap)

So I am back today like promised with another recipe. I think I am going to try and come up with a weeks worth of Korean recipes. How does that sound?

Well, for day two of the week I will being telling you about another rice dish. Fist Rice or 주먹밥 (Jumeok Bap)are fried rice balls, in other words. Fried rice which has been shaped into a ball. This is a favourite amongst many younger Koreans, such as kids because it makes food fun.

This has been called the Korean version of Onigiri (おにぎり) which is Japanese rice balls.

This is a very simple dish and there isn't much of a history behind it all. The story was probably that there were some children who were being naughty and did not want to eat their rice. To persuade them the eat, their mother probably came u with the idea, and it has stuck ever since.

Anyways, I'm going to move on to the recipe:

Ingredients
2 cups Cooked rice
1/4 cup Ham/ SPAM/ sausage (or whatever meat you want)
1/4 cup Carrot
1/4 cup Onion
1/4 cup Zucchini
Salt (to taste)
Sesame oil (if desired)
Canola oil
Sesame seeds

Method
1. In a big bowl, season rice with salt, sesame seed, and sesame oil. Set it aside.
2. Prepare and cut all the ingredients.
3. Preheat a pan on a low heat. Add canola oil.
4. Add carrot, onion, and zucchini on a pan. Stir.
5. Add whichever meat you prepared. Season with salt. Stir.
6. When the meat is done, add all the ingredients to the rice. Mix it well.
7. Wear plastic gloves, grab a small amount of mixture, and shape it like a small ball. (be careful that it is no hot, or else you are going to get a burn)You can also shape these into a triangle to get samgak gimbap (삼각김밥)
8. Place on a plate and serve.


And there you have it, a simple dish to make when the kids are getting rowdy or bored of your usual fried rice.

That is it from me today, I hope that you all enjoyed hat recipe and tomorrow I will post another recipe. Take care, and don't forget to check for the new recipe.

Monday, March 19, 2012

Ogokbap (오곡밥) Five-Grain Rice

Hey guys. Did you miss me?? My exams are finally over so I will be doing my week long of blogging starting todayyyyy!!!!

I am so happy that I will be able to share a number of different recipes over this week, even when I was procrastinating during my exams I was thinking about what recipes I should be posting up when I return.

So to start off the week, I thought that I should introduce you to Ogokbap (오곡밥) or Five-Grain Rice. This is a glutinous rice dish that is usually served at the end of Winter. I'm a bit sad though because I have just missed out on posting this before the change to spring in Korea, but it doesn't matter. It is still quite cold there these days.

Usually a mixture of rice, red beans, black beans, millet, and sorghum, but can be varied with glutinous rice and other grains in place of these. Ogokbap usually served during the end of winter, especially on the first full moon of the year (jeongwol daeboreum 대보름)

In the past, many Koreans ate foods lacking nutritional value during the long winter because food was scarce. Anticipating these problems, they dried grains before the coming of the winter to fulfill the winter’s meals. On the night of jeongwol daeboreum (대보름) , people would eat ogokbap with ingredients such as walnuts, chestnuts, pine nuts, and beans to provide them with adequate energy.

Today, the concept of making ogokbap has been changing. Koreans make ogokbap with many different kinds of grains that do not necessarily mirror those traditionally used in the past. Ogokbap continues to be enjoyed by Koreans for its nutritious and healthf benefits.

And now, for you as the reader to be able to experience the same nutritious and health benefits the recipe:

Ingredients
360 g glutinous rice
80 g black bean
85 g glutinous African millet
85 g glutinous millet
83 g sweet red bean
300 g scalding water
500 g boiling water
rice water
100 g sweet red bean boiled water
500 g water
10.5 g salt

Method
Preparation
1. Wash the glutinous rice, soak in water for 30 min. and drain water on a strainer for 10 min.
2. Wash the black bean, soak in water for 3 hours and drain water on a strainer for 10 min.
3. Wash the glutinous African millet by rubbing until washing water to be clear, soak in water for 1 hour, and drain water on a strainer for 10 min.
4. Wash the sweet red bean and remove foreign elements, drain water on a strainer for 10 min.
5. Wash the glutinous millet and drain water on a strainer for 10 min.
Recipe
1. Put sweet red bean and scalding water into the pot, heat it up for 2 min. on high heat. When it boils, discard the scalding water. Add fresh water to the sweet red bean, heat it up for 3 min. on high heat. Lower the heat to medium, boil for 20 min. taking care the bean not to be burst, drain through a strainer (131 g). Prepare rice cooking water with sweet red bean boiled water after adding water and salt.
2. Put the rice, black bean, glutinous African millet, sweat red bean and rice water into the pot.
3. Heat it up for 2 min. on high heat. When it boils, continue to boil for another 3 min. Lower the heat to medium, add glutinous millet and boil it for 10 min. When the rice become sodden, lower the heat to low, steam for 13 min. Turn the heat off, and let it sit there for 10 min. more to be well-done.
4. Mix them with scoop thoroughly and serve in a bowl.

And there you have it, delicious rice to help warm you up from the inside on a cold Winter's day.


I hope that you enjoy that recipe, and I will see you all tomorrow with another recipe :)

Wednesday, September 28, 2011

Kimchi Fried Rice 김치볶음밥

Another recipe today :D I told you that I would be back more because I'm on holidays at the moment.

Mmm....today I have decided that I will blog about kimchi fried rice or kimchi bokkeumbop (김치볶음밥)You might be thinking "kimchi fried rice? how does that work?" Am I right? Well it was made by housewives who did not want to waste the bits of kimchi left and, you still get the spiciness with delicious fried rice.

Kimchi Bokumbop is a popular restaurant or home prepared dish that is very simple but yet delicious in taste. It can consist of various choices in meat and chopped kimchi, which is then sautéed together along with other vegetables such as onions, garlic and green onions. A dash or more of soy sauce as well as sesame oil are added for seasoning, in addition to kimchi "juice” leftover in the jar. Lastly, an egg is cooked sunny side up and placed on top of this rice dish for taste as well as for decoration.

Usually at home, it's a way to use up kimchi before it gets too ripe to eat, in which case, it can also be used to prepare kimchi chigae. In Korean, bokum means sautéed or fried and bop translates into steamed rice. So essentially, kimchi bokumbop is fried rice with kimchi, and yes, all those stories about Asian restaurants - today's leftover rice is tomorrow's fried rice - is true and totally applies here. There can be infinite variations of this bokumbop dish where beef can be substituted with little bits of galbi, bacon, spam, or even tofu.

Anyways, now that you have got the background, I'll give you guys the recipe too. It really is a simple recipe.

Ingredients
2 cups cooked rice
½ cup kimchi with liquid
½ cup minced pork or ground beef
2 roots green onion
1 tbsp soy sauce
¼ onion
1 clove garlic
1 egg
Vegetable or olive oil
Salt & pepper

COOKING DIRECTIONS
1. Cook rice as directed in a rice cooker or in a pot.
2. Chop kimchi into small pieces. Save kimchi liquid to add to rice, if desired.
3. Dice and mince green onions, onions, and garlic.
4. Season the minced pork or beef with soy sauce, minced garlic and powdered pepper.
5. Sauté the pork (or other substitutes) with vegetable or olive oil in frying pan.
6. When the pork is cooked, add chopped onions, kimchi and cook for 5 minutes.
7. Add minced garlic and green onion. Cook a little more and turn off the heat.
8. Add cooked rice and mix all ingredients well.
9. Add 1-2 tbsp of sesame oil and re-heat again.
10. Add salt and pepper to meet taste.
11. Cook egg sunny side up
12. Put rice on a dish and place a fried egg sunny side up on top.


And there you have it, a delicious lunch or dinner that is simple to make and sure to tickle your taste buds.

Anyways, that is all from me today. I'll try and come back with another recipe in a couple of days. ^^