Showing posts with label beef. Show all posts

Wednesday, June 26, 2013

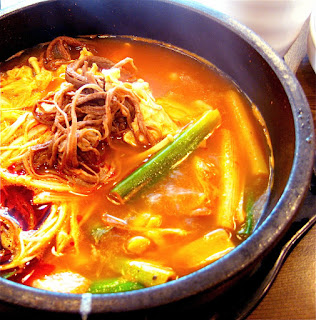
육개장 YukGaeJang

Heyyyy dere sexy peoples.

It's been a really long time since I have posted a blog :/ I have been busy with finals for uni and completing assignments so there hasn't been any post for a really long time :( BUT I finished all of my exams yesterday, so I'm not back with a recipe. I'm going to be on break until August so I'll probably try and do a post a week, possible more sometimes.

I hope that you have all been well ~~~

Let's see how we are going in terms of seasons, it's now summer in Korea, so we probably want some summer food right? Even though it is not the hottest time of the year just yet, this dish can still be something that you can enjoy to help cool you down. And it is also great for the colder countries in the southern hemisphere where it is winter at the moment,

The dish for today is called yukgaejang (육개장). It is a spicy soup-like dish that is made with beef and scallions as well as other ingredients such as bean sprouts (kong namuel), bracken, taro stem, onion and dangmyeon (sweet potato noodles). It is usually served with rice and kimchi.

The dish can also be made using chicken, and in that case it could be called dak yukgaejang.

This is a hot spicy dish so you may be confused about why it would be eaten in the summer. Western cultures tend to eat cold foods to cool down in the summer, this cools you down from the inside. However in Korea, they also like to cool themselves down from the outside by eating hot spicy foods to sweat more and thus also be cooled that way.

Ingredients
600g beef brisket
1 small onion
100g bean sprouts
50g taro stem (found dried in Asian marts)
50g bracken (found dried in Asian marts)
3 green onions
1/2 korean radish
3 tbs chilli flakes (gochugaru)
2 tbs minced garlic
3tbs soy sauce
60ml sesame oil
60ml vegetable oil
3tbs salt
1tbs pepper
4L water

Method
1. Soak the taro stem and bracken in warm water for an hour.
2. In a large pot add beef, onion, green onions and all the water. Boil it for 30min on a medium heat with the lid on.
3. Blanch the soaked taro stems and bracken in water for about 10 minutes. Squeeze all the water out and then cut into 10cm pieces.
4. Cut the radish into 1cm pieces
5. Remove the cooked beef from the broth and let it cool for 30 min. After that, tear the beef into small strips.
6. In a bowl mix half the chilli flakes, with 3 tbs sesame oil, soy sauce, garlic, 1tbs salt and the pepper. If you want you can add more chilli flakes.
7. Add the bracken, taro stem and meat in a bowl with half of the sauce and let it sit for 10 minutes.
8. Add the sauce mixture into the broth with the radish and boil it for 40min on a medium heat.
9. In a small pot add all the remaining oil and chilli flakes and stir fry for 2 minutes, constantly stirring to prevent burning.
10. Strain the chilli oil through a cheesecloth.
11. Add some more green onions, bean sprouts, rest of the spicy sauce and chilli oil to the broth and salt to season. Boil for another 10 minutes.
12. Serve with rice and kimchi.

And there you have it, a nutritious dish to eat in summer or winter to cool you down or to warm you up. Either way it is bound to satisfy you.


I hope that you like that dish because it is certainly what I'm going to have for dinner tonight as it is super-duper cold and rainy at the moment. Have a try of it when it is super hot or cold and you will feel the heat of the dish radiate throughout the rest of your body.

I'm going to post more in the coming days, and until then remember to keep warm, safe, healthy and happy!
Wednesday, November 7, 2012

Beef and Kimchi Pepper Rice | almost Pepper Lunch|

Hey guys, I finished all of my exams yesterday and I am back from a day of shopping to bring you a new blog post. I hope that you guys will enjoy this, and I really loved the idea of sharing this because I had something similar at lunch.

The inspiration for today's recipe comes from today's lunch which was at Pepper Lunch. They are really awesome and you should check out one of their stores if there is one near you. I don't work for them and this recipe is based solely on my own experience and ideas.

So the main idea that is reoccurring in all the dishes from the store is that there will be raw meat and rice that is brought out on a hot plate so you have to 'cook' it yourself. It is practically do it yourself teppanyaki.

And now to my version of this dish... I don't know if this will work because I can't try it out at home (no hot plates.... :( ) If you have tried this please do comment below and tell me how it went and whether I should change anything.

Ingredients
200g of beef skirt sliced thinly (any lean cut will do)
1/4 can of corn kernels
1/2 tsp of crushed pepper (not ground)
1/4 tsp salt
1 tsp cooking oil
1 tsp butter
2 tsp chopped spring onions
1 cup cooked rice

Method
1.  Make sure that the beef is entirely thawed and sprinkle salt and mix.
2.  Oil a hot plate and heat it until there is smoke
3.  Put the rice in the middle of the plate while still hot.
4. Turn off the heat and scatter the meat around the rice forming a ring around the rice.
5. Top the rice with the butter (this is the key to a tasty meal)
6. Then top with the corn, pepper and spring onions.
7. Serve immediately

NOTE: 
- I know you want to eat it but please do be careful because it is VERY hot at the beginning. And don't forget to hurry up and mix the dish up because the meat will burn and stick.
- I think that if you don't have a hot plate you could try and use a wide bottom Korean stone pot, like one used for dolseotbap. It should be able to work the same.

And there you have it, my take on the popular pepper rice dish.


AND if you want to try it with kimchi then cut up 1/2 cup of kimchi and put it on top of the rice after the corn.
(all images are taken by me) 
And there you have it, a at home version of the popular Pepper Rice dish.

I hope that you enjoyed the post because I certainly had fun writing it as my first post after I finished my exams.

Hopefully you guys will stay healthy, happy and safe until my next post.

Sunday, September 18, 2011

Mandu 만두

Kekeke, as I said yesterday here is another blog post today. I'm relishing the amount of free time I have at the moment after exams. Anyways...I've been thinking about what to blog about today and I figured that it was about time that I had introduced a staple in Korean Cuisine. Mandus (만두) , if you like or enjoy Chinese food then you are likely to have encountered the Chinese equivalent of this before, dumplings.

Now for a bit of a history lesson: Mandu (만두) are believed to have been first brought to Korea by Mongolians in the 14th century during the Goryeo Dynasty. The state religion of Goryeo was Buddhism, which discouraged consumption of meat. Mongolian invasion of Goryeo relaxed the religious prohibition against consuming meat, and mandu was among the newly imported Mongolian dishes that included meat.

Another possibility is that mandu (만두) came to Korea at a much earlier period from the Middle East through the Silk Road. Historians point out many cuisines based on wheat, such as dumplings and noodles originated from Mesopotamia and gradually spread from there. It also spread east along the Silk Road, leaving many versions of mandu throughout Central and East Asia.

But it doesn't really matter how you look at the history, all you need to know is that these things are delicious. They can be eaten a number of different ways, they can be boiled, steamed or fried. They are really versatile and the fillings are up to you, there are probably 100 different ways to eat them. This is also a popular street food that is eaten by Koreans in winter.

I'm going to show you how to make a simple mandu with a pork and beef filling. The recipe is a bit long and it is split into parts, but I'm going to tell you a short cut at the end of it. OK? Let's go

Ingredients:

1 cup of ground pork
2 cups of ground beef
2 cups of chopped boo chu (Asian chives)
4-5 soaked Shiitake mushrooms
half onion
half package of tofu
3 cloves of minced garlic
salt
sugar
sesame oil
vegetable oil
fish sauce
egg
green onion
mandu skins (60 discs) <-- dumpling skins from the Asian grocer will go

Make filling:

1. Place 1 cup of ground pork and 2 cups of ground beef into a big bowl.
2. Add 1 ts of salt, 1 tbs of sesame oil, ½ ts of ground pepper and mix it by hand and push the mixture of meat on the side of the bowl.
3. Wash asian chives (bu chu), dry well with paper towel or cotton cloth and then chop them to make 2 cups. Add 1 tbs of oil and mix it up. Place it in the big bowl next to the ground meat.
tip: oil will coat vegetables so that liquid would not come out from it
4. Chop 4-5 soaked shiitake mushrooms and half an onion and put it into a small bowl.
5. Add 1 ts of soy sauce, 1 ts of sugar, and 2 ts of sesame oil the small bowl in the last step. Mix it by hand and then transfer it to the big bowl.
6. Squeeze half a package of tofu using cotton cloth or paper towel and put it into a small bowl. Then add a pinch of salt, 1 ts of sesame oil and mix it and put it next to chopped chives.
7. In the big bowl, add 3 cloves of minced garlic and mix all ingredients by hand.


Make Mandu:

1. Place one mandu skin on your left hand and put some filling mixture on the center of the skin.
2. On the half of the edge of the skin, put a little cold water with your fingertips.
3. Fold skin in half over filling and press edges together to make ripple shape.


To Fry
1. Place some vegetable oil on heated pan and add mandu.
2. Lower the heat over low medium and cover the lid of the pan to cook.
3. A few minutes later, open the lid and turn over each mandu. Place 2-3 tbs of water and cover the lid. Cook a few minutes more over low heat.
4. When the mandu is golden brown, transfer it to a plate.
5. Serve hot with dipping sauce (equal parts vinegar and soy sauce).


To Steam
1. Place the mandu in the freezer to harden for an hour or so.
2. Just place a steamer or metal colander over a boiling pot of water.
3. When water starts to boil, place frozen mandu like so. Don't overlap them. They'll stick to each other.
4. Cook about 5-8minutes or until the wrapper has turned a more transparent colour. Tip: If you are unsure you can check the inside and see if the meat is cooked.
5. Serve with soy sauce.


To Boil
1. Bring to the boil a pot of water, enough for the number of mandus you are cooking
2. Carefully place the mandu's in so that you do not scold yourself
3. Cook till the mandu's rise to the surface of the water.
4. Scoop out and serve with soy sauce.


And there you have it, three different ways to eat the same thing. As I had said before to make the dish is actually a bit tedious and long. The cheats way is that you can always go and but frozen mandu from the grocer and just cook them yourself, but isn't it nicer too eat food that you have made by hand?

Anyways, maybe spend this week making a supply of mandu and I'll be back with another recipe next week ^^