Sunday, October 30, 2011

Red Bean Ice-Cream 팥 아이스크림

Hey guys...I'm back again this week, and I'm not in a rush this time so....it might be a long-ish post. Probably not because I have only had enough time to prepare one recipe..... >.<

Anyways, I am finally doing a Korean recipe again. It has been so long, it must have been like what....a month since my last Korean recipe?

Recently it has been really warm in Australia...so I'm going to introduce to you guys a refreshing Korean dessert...ok, is isn't really all that Korean. You can say that it is a fusion Korean and Western take on something that we all like to eat, sans those who are lactose intolerant.

So I'm going to show you guys how to make Red Bean Ice-Cream. It is pretty simple and there are two ways of making it..one is a cheat's way and the other....not a cheats way I guess.

There really isn't any history lesson for this dessert because it is a fusion thing...and you can pretty much guess from the title. It is just red bean flavoured ice-cream.

To get started....the not cheats way first

Ingredients
2 Cup Red Bean Paste
2 Cup Whipping Cream
1 Cup Milk
8 Tbsp Sugar <-- to be adjusted to your liking

Method
1. Combine all of the ingredients in a mixing bowl
2. Combine the mixture until it is smooth
3. Pour the mixture into popsicle moulds
4. Let it harden over 6 hours
5. Take it out and enjoy!!!


You may find that it is a bit harder compared to normal ice cream, but that is normal. If you try the cheats way it should be considerably more
soft.
Cheats way

Ingredients

2 Cup Red Bean Paste

1 L of Vanilla ice-cream
sugar to adjust to your liking

Method
1. Combine all of the ingredients in a mixing bowl
2. Combine the mixture until it is smooth
3. Pour the mixture into popsicle moulds
4. Let it harden over 6 hours
5. Take it out and enjoy!!!


Ok, so there you have it, two ways to make red bean ice cream. Two recipes, the same result and pretty much the same work. you can choose which one you can to use. If you are wanting to get even more fancy inc-cream I suggest you use the first recipe and an ice-cream mixture to get a proper ice-cream result.

Anyways, like I said. There you have it a refreshing Korean dessert to eat as you tackle the hot and humid Australian weather at the moment. I know that it is starting to get cold in Korea....so it is a bit weird to be posting a summer dessert now. But I will try to post something for the Korean readers in the coming week.

That is it from me today...and I will be back soon ^^

Saturday, October 22, 2011

Pistachio and Raspberry Jelly Cake

Hey guys, so just another quick post before I have to head out. This time it is another dessert for the spring.

I hope that you guys enjoy it :)

The dish is kinda hard, so don't be surprised if it does not turn out looking right. Also, if you are allergic to nuts do not try this in case you have a reaction.

Anyways, the recipe....

Ingredients
Cake
250g butter, softened
250g sugar
1/2 lemon, finely grated rind
250g eggs
125g plain flour sifted
125g ground pistachios
7g baking powder

Jelly
560g pitted lychees in syrup, drained
300g raspberries
5g gelatine powder

Cream
1/3 cup marscarpone
2 tablespoons icing sugar to taste
1 teaspoon of lemon juice

Garnish
raspberries
sifted icing sugar
raspberry coulis

Method
1. preheat over to 160 C. grease a 20cm x 30cm pan and line
2. For cake: beat butter and sugar, then add lemon zest. Slowly add eggs one by one, and beat until well combined. Fold in flour, pistachios and baking powder. Spoon and spread the mixture into tin and bake for 30 min until a skewer comes out clean. Remove from oven and allow it to cool completely
3. For jelly: line a second tin with baking paper. Puree lychee and raspberry in a blender until smooth. Pour puree into a saucepan and heat over medium-low heat. Add the gelatine to the puree and stir until dissolved. Strain through a fine sieve. Pour into tray and refrigerate for about 45 min, or until set.
4. For cream: beat until combined.
5. To assemble: cut 15 rounds from the cake using a 5cm cutter. Slice each in half. Cut 15 rounds from the jelly. Lightly spread each underside of cake with the marscarpone cream. sandwich together with the jelly. Place a raspberry on top of each cake and dust with icing sugar. Smear some of the raspberry coulis onto the plate and top with cakes.


And there you have it. A nice refreshing summer dessert to enjoy now.

Now I need to go out...so I'll try and post again next week.

Sunday, October 16, 2011

Passionfruit and Orange Tart

So, it seems that it has been a while since I have last posted doesn't it? Well the reason for that is because school has started again so I can only really post on the weekends, and I have been quite busy these days..so that is why I am posting so late ><

Anyways, this is just going to be a short post so that I fulfill my weekly posting addiction. Today it is going to be a recipe on Passionfruit and Orange Tart. Spring is finally beginning to feel like spring in Australia, so I thought that I should blog about a spring/summer dessert to get us ready for spring.

The recipe is quite easy, so let's get started.

Ingredients
1 1/2 cup plain flour
1/4 cup icing sugar
125g butter
1 egg yolk
1-2 tablespoons of cold water
icing sugar for dusting
Filling:
3 eggs
2 egg yolks
300ml thickened cream
1/2 cup caster sugar
1/2 cup passionfruit pulp
1 tablespoon grated orange rind
1 tablespoon orange juice

Method
1. Process flour, icing sugar and butter in a food processor until mixture looks like fine breadcrumbs. Whilst motor is on, combine egg yolk and water until mixture forms a ball.
2. Lightly knead dough on a floured surface until smooth. Wrap in a plastic wrap and chill for 30 min.
3. Roll out pastry to line a 24cm flan tin, trim edges and pose base. Chill for another 30 min.
4. Cover pastry in baking paper, and fill with dried beans or uncooked rice. Bake at about 190 C for 15 minutes. Remove paper and beans and bake for another 10 minutes or until pale golden brown.
5. For Filling: Lightly whisk all ingredients in a large jug. Do NOT overmix. Pour into pastry case and bake at about 180 C for about 25-30 minutes until just set. Cool.
6. Chill and serve dusted with icing sugar.


And there you have it, a nice summer dessert that can be made now. I hope you guys enjoy that, and I'll try and post again next week.

Friday, October 7, 2011

Afghan Biscuits and Sticky Toffee Pudding

Hey guys, today I was thinking that instead of talking about a Korean recipe, I would talk about just dome desserts. I has been a while since I have strayed from a Korean recipe hasn't it? I felt that it was about time that I was also able to introduce other recipes that I like. Don't worry. I will return to Korean recipes.

This is good, this gives me a chance to share with you guys other types of food that I love, and hope that you will like too.

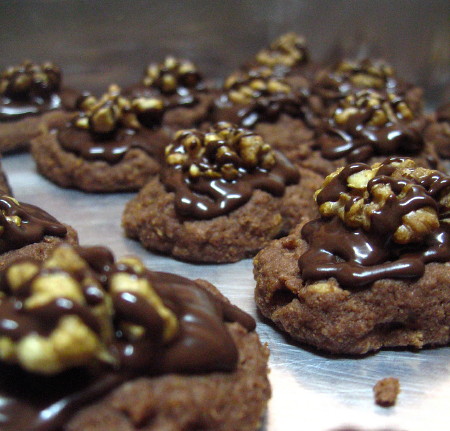
The first recipe today is going to be Afghan Biscuits. An Afghan biscuit is a traditional New Zealand biscuit made from cocoa powder, butter, flour and cornflakes, topped with chocolate icing and a walnut. I can be summarised as a cookie and icing, a cross between a cookie and a cupcake if you will. Now, without further ado, the recipe for it.

Ingredients
200g butter
1/2 cup brown sugar, firmly packed
1/2 teaspoon vanilla
3/4 cup plain flour
3/4 cup self raising flour
2 tablespoons cocoa
1 1/2 cup cornflakes
1/4 cup desiccated coconut
2 tablespoons milk
Icing:
150g dark chocolate
20g butter
walnut pieces for garnishing

Method
1. Cream butter, sugar and vanilla
2. Fold in sifted flours and cocoa. Stir through cornflakes, coconut and milk.
3. Roll level tablespoons of mixture into balls. Arrange an a baking tray and flatten slightly with a fork.
4. bake at 180⁰C for 15-20 min. Cool
5. Icing: Combine chocolate and butter and stir over heat until smooth.
6. Spread icing on biscuits and top with a walnut piece.


And there you have it, a simple dessert that you can make in practically no time.

The other recipe that I wanted to share with you guys today is a recipe for Sticky Toffee Pudding. I am sure that you have all heard of sticky date pudding, well this is just a spin on that.

A Sticky Toffee Pudding is originally a British steamed dessert consisting of a very moist sponge cake, made with finely chopped dates or prunes, covered in a toffee sauce and often served with a vanilla custard or vanilla ice-cream. Anyways, here is my version of the dessert.

Ingredients
1 1/2 cups boiling water
1 cup chopped dates
1 teaspoon bicarb soda
75g butter
3/4 cup brown sugar
1 teaspoon vanilla
2 eggs
1 1/2 cups self raising flour, sifted
Caramel Sauce:
1 cup brown sugar
100g butter
3/4 cup thickened cream
1/2 teaspoon vanilla

Method
1. Grease and line base of a 18-20 cm square deep pan with baking paper
2. Pour boiling water over dates and bicarb soda, stand for 5 minutes.
3. Cream butter, sugar and vanilla, beat eggs in one at a time. Fold in flour and date mixture.
4. Pour into the pan.
4. Bake at 160⁰C for 40min or until it is cooked.
5. Caramel Sauce: stir all ingredients over a heat until it boils and let it simmer for 2 min.
6. Remove pudding from pan, pour 1/3 of caramel sauce over the warm pudding.
7. Slice and serve with remaining sauce and cream or ice-cream.


And there you go, two easy desserts to try any time of the year.

That is it from mt today, I'll be back with more recipes soon. They may be Korean they may not be. We will see ^^ 안녕

Wednesday, October 5, 2011

"Army" Stew 부대찌개

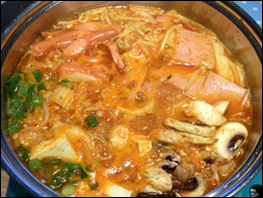
Like I had promised yesterday, here is another post today. Like the title, the dishis going to be 부대찌개, which translate to be ARMY STEW.

The origins of the dish goes back to the end to the Korean War. During the war, Koreans have salvaged any means of food from the American soldiers in which there were an abundance of hot dog, sausages, and spam along with other staples. Due to the scarcity of meat during the war they used these as substitutes for their stews.

Much like kimchi chigae, this soup-based dish contains kimchi, tofu, scallions, onions, gochujang, and much more. Also, to add texture and volume to the soup, it can contain vermicelli as well as ramyun noodles. It is consumed along with a bowl of steamed rice to compliment its spiciness and its abundance in meat such as spam, sausages and pork.

The dish is also referred to as Johnson Tang (존슨 탕), combining the common American surname Johnson and tang (탕) a word meaning soup. The city of Uijeongbu, which is bordered by Seoul to the south and has many army bases, is famous for its budae jjigae. In the late 20th century, the city of Uijeongbu had stipulated that the dish be referred to as Uijeongbu jjigae to remove the military or war-time connotation in the name, though not many restaurants follow this guideline. Some restaurants have begun calling their product Uijeongbu budae jjigae.

That is the history lessen for the dish, but even though it was eaten because of the scarcity of meat it is still enjoyed now by many Koreans because of the many ingredients that you can put into the dish.

I'm going to show you guys my version of army stew, but do keep in mind that you can practically add anything that you want into the dish because it is characterised for having a variety of different ingredients.

Ingredients
Can of Spam
6 Frankfurter sausages
150g of Tofu
1 Instant Noodle (minus the soup base)
handful of Rice cakes (if you want)
1/2 Onion
2 Mushrooms
2 spring onions
Enough water to cover

Sauce
3 Tablespoon of Gochujang
2 Tablespoon of Red Pepper Powder
2 Cloves of crushed garlic
3 Tablespoons of Soy Sauce
Salt to taste

Method
Cut the Spam, sausages and tofu in to slices and cut all the vegetables. In a bowl add all the ingredients for the sauce and mix well, Place the sauce in to the pan and add the other ingredients around it, keep the noodles to on side for now. Add the water so that everything is covered.


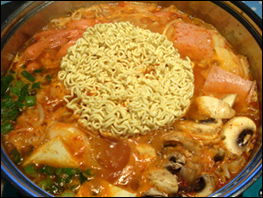
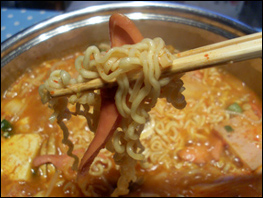
Bring the entire mix to boil and cook well, this should take about 15 minutes, the easiest way to check is to see if the onion is soft. At this point add some noodles it is common to use some instant noodles, you could though use any supermarket noodle. This will take a further 3-5 minutes to cook.


Serve in a bowl and enjoy, there should be plenty for up to 5 people and you could serve with rice and some side dishes if you like, however with the noodles there is enough to fill you up.


And there you have it a simple dish that is sure to please everyone. IF you are worried about how spicy the stew is going to be you can adjust the amount of gochujang and pepper powder used.

Anyways, I'll post another recipe soon ^^

Tuesday, October 4, 2011

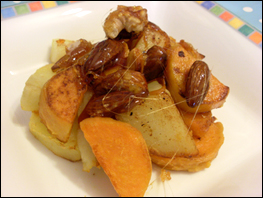
Sweet Potato Mattang 고구마 맛탕

Hey guys, I'm kinda busy today but I really wanted to post, So it is just going to be a short post and recipe.

Today it will be mattang, which is a sweet potato dessert.

Ingredients
1 Sweet potato
1 Potato
150g of sugar
Some Hazelnuts and Walnuts

Method
1. Peel and cut the potatoes in to chunks, similar in size to roast potatoes is about right. To cook steaming is best and for about 10 minutes is fine (In South Korea, Mattang in commonly deep fried).

2. Once you have steamed the potatoes fry in a small bit of oil for a couple of minutes. In a small pan, melt 150g of sugar on a medium heat so it becomes a syrup and then add the nuts.

3. You have a choice with the syrup, you can add this to the pan and mix all together or I prefer to serve on a plate and pour the syrup on top. Cooking altogether will give you sweeter potatoes, once its all cooked eat warm so the syrup doesn't go hard.


This is a very simple dessert that can be eaten all year around, and it is enjoyed by everyone, especially younger children.

This is it for today, I'll try and come back with another recipe tomorrow ^^