So yesterdays post was a snack. Today's post is also gonna be a snack. I think this week might end up being a blog roll of snacks from around the world.
I hope that the caramel popcorn from yesterday was a success because I'm currently snacking on some right now. I would also be sipping some of today's recipe if it wasn't for the fact that it is 10pm and I won't be able to sleep if I had some.
As you can guess from the title of this blog post, today's recipe is going to be Vietnamese Iced Coffee. Kind of like the best drink to have ever been invented if you are looking for a serious pick me up on a swealtering hot summer's day, or even just a sweltering Spring day.
In Vietnamese the drink is known as ca phe da or cafe da. It is simple and is made with finely ground Vietnamese coffee which has a distinctive earthy flavour before being mixed with condensed milk and LOTS of ice.
The coffee was introduced to Vietnam by the French during the 19th C and condensed milk was used due to the lack of fresh milk available in the country along with a dark roast of coffee. It resulted in a strong blend of coffee that was balanced by the sweet condensed milk. Anyways to the recipe:
Ingredients
2 tbs of ground Vietnamese coffee (or dark roast coffee)
2 tbs condensed milk (can adjust to own taste)
1/2 cup boiling water
A LOT of ice cubs
Method
1. Prepare the coffee in a Vietnamese coffee filter or use a coffee machine accordingly.
2. Fill your cup with ice cubes while you wait for the coffee to drip through.
3. Pour hot coffee into the cup and then top with condensed milk.
4. Add a straw and use it to stir the condensed milk through.
And there you have it, a super simple drink to make to relieve yourself from the heat of the sun any time of the year.
I hope that you have been liking the posts so far, stay tuned for more throughout the week :)
Sunday, September 29, 2013
Saturday, September 28, 2013
Caramel Popcorn
I'm going to be honest here, I'm terrible at keeping this whole blogging thing going, It's pretty much been at least a whole month since I've last posted a blog because I've just been too lazy. I'm not even going to say that it is because I've been bust. Every since mid-sem exams have finished I've just done nothing at home. Apart from catching up on lectures that I've missed (I've still got a long way to go).
But since it is now the mid-session break I'm going to strike another deal with you. My one week of non-stop posting. I'll do another one of those this week. Starting today and ending on Friday. So you'll have 7 new recipes to keep you entertained and cooking up a storm in the kitchen for like 1 month, maybe 6 if you do a recipe a week. There isn't going to be any particular theme this time, but who knows it might come out of nowhere.
So are we all OK with this deal? One week of posts starting today :)
So the first recipe for this week will be caramel popcorn. Sweet goodness that melts in your mouth, keeps your fingers sticky and reaching for more and more until you hit the bottom of the container. Unlike the usual caramel popcorn I'm going to put a slight twist on this one. Usually it is just sweet, but this time I'm going to give it an ultimate sweet and savory twist by using buttered popcorn instead of plain. Stay tuned for more.
Ingredients
1 pack of buttered microwave popcorn
1 cup brown sugar
1/4 cup light corn syrup
6 tbs unsalted butter
1/2 tsp baking soda
2 tsp vanilla essence
Method
1. Pop the popcorn according to instructions on the bag.
2. In a saucepan melt the butter and then add sugar, corn syrup and 2tbs of water. Turn to medium heat and whisk until the mixture is a golden colour.
3. Turn heat off and add the baking soda and vanilla, quickly mix in.
4. Quickly pour mix over popcorn, and try to mix as well as you can without breaking the popcorn, Doesn't matter if it isn't perfectly mixed yet.
5. Pour mixture onto a lined baking tray and place in an oven pre-heated to 120C.
6. After about 20 minutes the caramel should be movable so use a spatula to evenly coat the popcorn mix in caramel. You can repeat this every 10 minutes until the popcorn is evenly coated.
7. When the mix is evenly coated, take it out of the oven to cool before storing in an air-tight container or eating straight away.
And there you have it, a sweet and buttery snack that you can have a home ready for a movie night or just a yummy snack to have all the time.
NOTE: If you want to make salted caramel popcorn you can all 1 tsp of sea salt into the melted butter mix to give it a slight salty taste.
I hope that this recipe will be enough to keep you satisfied until tomorrow because there will be more delicious goodness in tomorrows recipe.
Stay tuned for tomorrow guys!!
But since it is now the mid-session break I'm going to strike another deal with you. My one week of non-stop posting. I'll do another one of those this week. Starting today and ending on Friday. So you'll have 7 new recipes to keep you entertained and cooking up a storm in the kitchen for like 1 month, maybe 6 if you do a recipe a week. There isn't going to be any particular theme this time, but who knows it might come out of nowhere.
So are we all OK with this deal? One week of posts starting today :)
So the first recipe for this week will be caramel popcorn. Sweet goodness that melts in your mouth, keeps your fingers sticky and reaching for more and more until you hit the bottom of the container. Unlike the usual caramel popcorn I'm going to put a slight twist on this one. Usually it is just sweet, but this time I'm going to give it an ultimate sweet and savory twist by using buttered popcorn instead of plain. Stay tuned for more.
Ingredients
1 pack of buttered microwave popcorn
1 cup brown sugar
1/4 cup light corn syrup
6 tbs unsalted butter
1/2 tsp baking soda
2 tsp vanilla essence
Method
1. Pop the popcorn according to instructions on the bag.
2. In a saucepan melt the butter and then add sugar, corn syrup and 2tbs of water. Turn to medium heat and whisk until the mixture is a golden colour.
3. Turn heat off and add the baking soda and vanilla, quickly mix in.
4. Quickly pour mix over popcorn, and try to mix as well as you can without breaking the popcorn, Doesn't matter if it isn't perfectly mixed yet.
5. Pour mixture onto a lined baking tray and place in an oven pre-heated to 120C.
6. After about 20 minutes the caramel should be movable so use a spatula to evenly coat the popcorn mix in caramel. You can repeat this every 10 minutes until the popcorn is evenly coated.
7. When the mix is evenly coated, take it out of the oven to cool before storing in an air-tight container or eating straight away.
NOTE: If you want to make salted caramel popcorn you can all 1 tsp of sea salt into the melted butter mix to give it a slight salty taste.
I hope that this recipe will be enough to keep you satisfied until tomorrow because there will be more delicious goodness in tomorrows recipe.
Stay tuned for tomorrow guys!!
Friday, August 30, 2013
Homemade CocoHodo
So I’m writing this post as I sit on the plane to go on holidays. And mannnnn it is boring. So I decided that I’d just write up another blog post, even though this post won’t be going up for a couple of days.
I hope that you guys enjoyed the last post, Tom n Toms style honey bread, I’m really craving some at the moment……… too bad I’m on a plane and not actually going to a place that has Tom n Toms.
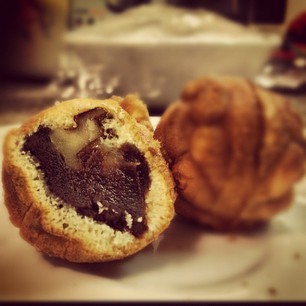
Anyways, today I’m going to be introducing you to another Korean snack food, and that is the coco hodo’s. These are little walnut pastries that are shaped like a walnut. These are particularly popular during winter when you can get them from street vendors. They are a particularly good in between meal snack to take on the go. They are quite inexpensive to buy, but it is always more fun to make your own.
To me I’d call them Korean profiteroles, although not really. It's made from a walnut pastry with a red bean filling and are AMAZING. The name is a bit deceiving when it is said in English, you sort of expect it to be made with chocolate coco = cocoa, but that might be just me.
-------------------------------------------------------------------------------
And that was all I got up to on the plane. I never actually managed to finish the post and here I am more than a month after returning finishing off the post. I'm so sorry for not posting much over the last 2 months, but I couldn't even access blogspot when I was on holidays and uni just got so overwhelming when I returned. I mean I've got exams in like 1 1/2 weeks and I and epically screwed.
Anyways, I hope that this recipe is going to satisfy your craving for new recipes and I'll try my best to put out recipes on a more regular basis. It should be quite easy once exams are over this semester. And I can't wait to share photos of the food that I ate whilst I was on holiday.
Anyways, back to today's recipe. Coco hodo. I'm pretty sure that I've covered all the introductory bases so let's move on to the recipe. I'm going to use a profiterole kinda pastry, so a choux pastry since I have no idea how to make the actual pastry, but I'll be adjusting it so it is similar in taste.
Ingredients
125 ml water
125 ml milk
100 grams butter
pinch of salt
100 grams flour
50g walnut flour (or almond meal) -- gives a nutty taste
4 eggs
1 cup red bean paste (store bought or home made)
2 tbs double cream
50g walnuts
Method
1. Heat the oven to 220ᴼC.
2. To make the pastry, melt the butter with water and milk in a large pan.
3. Bring to boiling point and tip in salt and flour. Using a wooden spoon beat hard for up to 30 seconds, till the dough no longer sticks to the sides of the pan.
4. Cool to room temperature (about 10 minutes).
5. While the dough is cooling, line 2 baking trays with baking paper.
6. When the dough has cooled beat the eggs, one at the time till the dough is smooth and glossy. Pour the dough into a pastry bag and pipe out profiteroles (about the size of a walnut) leaving enough space for them to rise, otherwise spoon with teaspoons. Tip your fingers in cold water and smooth the surface of profiteroles, as any spikes are likely to burn.
7. Bake the profiteroles in 220ᴼC for 10 minutes, then reduce to 190ᴼC and bake for another 15-20 minutes, until golden brown.
8. Using a knife poke a hole in each profiterole to let out the steam (and to fill later) and leave them to cool on a rack.
9. While the pastry is cooling prepare the red bean paste. You can adjust the sweetness of the paste to your liking and to make it extra smooth and creaming add 2 tbs of double cream.
10. Also cut the walnuts coarsely and mix it through the red bean mixture.
11. Fill a piping bag with the paste and get ready to pipe the pastry when it is sufficiently cool.
12. Fill the pastry with the hole that is at the base of the pastry.
And you are DONEEEEEEE.
I hope that you guys enjoyed the last post, Tom n Toms style honey bread, I’m really craving some at the moment……… too bad I’m on a plane and not actually going to a place that has Tom n Toms.
Anyways, today I’m going to be introducing you to another Korean snack food, and that is the coco hodo’s. These are little walnut pastries that are shaped like a walnut. These are particularly popular during winter when you can get them from street vendors. They are a particularly good in between meal snack to take on the go. They are quite inexpensive to buy, but it is always more fun to make your own.
To me I’d call them Korean profiteroles, although not really. It's made from a walnut pastry with a red bean filling and are AMAZING. The name is a bit deceiving when it is said in English, you sort of expect it to be made with chocolate coco = cocoa, but that might be just me.
-------------------------------------------------------------------------------
And that was all I got up to on the plane. I never actually managed to finish the post and here I am more than a month after returning finishing off the post. I'm so sorry for not posting much over the last 2 months, but I couldn't even access blogspot when I was on holidays and uni just got so overwhelming when I returned. I mean I've got exams in like 1 1/2 weeks and I and epically screwed.
Anyways, I hope that this recipe is going to satisfy your craving for new recipes and I'll try my best to put out recipes on a more regular basis. It should be quite easy once exams are over this semester. And I can't wait to share photos of the food that I ate whilst I was on holiday.
Anyways, back to today's recipe. Coco hodo. I'm pretty sure that I've covered all the introductory bases so let's move on to the recipe. I'm going to use a profiterole kinda pastry, so a choux pastry since I have no idea how to make the actual pastry, but I'll be adjusting it so it is similar in taste.
Ingredients
125 ml water
125 ml milk
100 grams butter
pinch of salt
100 grams flour
50g walnut flour (or almond meal) -- gives a nutty taste
4 eggs
1 cup red bean paste (store bought or home made)
2 tbs double cream
50g walnuts
Method
1. Heat the oven to 220ᴼC.
2. To make the pastry, melt the butter with water and milk in a large pan.
3. Bring to boiling point and tip in salt and flour. Using a wooden spoon beat hard for up to 30 seconds, till the dough no longer sticks to the sides of the pan.
4. Cool to room temperature (about 10 minutes).
5. While the dough is cooling, line 2 baking trays with baking paper.
6. When the dough has cooled beat the eggs, one at the time till the dough is smooth and glossy. Pour the dough into a pastry bag and pipe out profiteroles (about the size of a walnut) leaving enough space for them to rise, otherwise spoon with teaspoons. Tip your fingers in cold water and smooth the surface of profiteroles, as any spikes are likely to burn.
7. Bake the profiteroles in 220ᴼC for 10 minutes, then reduce to 190ᴼC and bake for another 15-20 minutes, until golden brown.
8. Using a knife poke a hole in each profiterole to let out the steam (and to fill later) and leave them to cool on a rack.
9. While the pastry is cooling prepare the red bean paste. You can adjust the sweetness of the paste to your liking and to make it extra smooth and creaming add 2 tbs of double cream.
10. Also cut the walnuts coarsely and mix it through the red bean mixture.
11. Fill a piping bag with the paste and get ready to pipe the pastry when it is sufficiently cool.
12. Fill the pastry with the hole that is at the base of the pastry.
And you are DONEEEEEEE.
This doesn't turn out to be a chewy as the original, but the pastry remains light and fluffy. It's not the easiest thing to make, but it is nice because it means you can still enjoy coco hodo even if you aren't near a store.
So I hope that you liked this recipe, and I'll try my best to post more often. Maybe in about 2 weeks time I'll have another post out. Until ten remember to stay safe, happy and healthy!!!
Labels:
chewy,
chocolate,
cocoa,
cocohodo,
firewalls,
holiday,
Homemade Coco Hodo,
korea,
korean profiterole,
photos,
plane,
profiterole,
red bean,
snack,
street food,
sweet,
tomntoms,
walnut,
winter
Saturday, July 6, 2013
Korean Honey Bread 허니브레드 | Tom n Toms Style |
It has been a while since I last posted a recipe again...woops. Sorry!!! I've kinda been busy packing to go on holidays :D:D:D I leave tomorrow and just procrastinating in general. I'm going to try and have all my posts for when I'm away all lined up, if not I'm going to try and write them while I'm busy travelling in cars, trains and buses.
Anyways, today's recipe is a Korean favourite. You may also love this dish if there is a Tom n Toms near where you live. There is the legend-wait for it-ary honey butter toast with ice-cream. It is absolutely AMAZING. And you know what? Today I'm going to show you how to make it at home.
It may not be exactly the same as what you can get in store, but it is a pretty good dupe and if you are like me, too lazy to actually go out and buy it you can enjoy it 24/7 at home. Honestly, for most of us it is too much of a hassle to go out to Tom n Toms unless it is literally right below where you live.
I don't know if you know about this dish much, but it is pretty much a thick slice of toast that is topped with various types of sweet things on top and it is absolutely delicious with the Tom n Toms blue lemonade.
Anyways, I'll tell you how to make it and then you can look at the pictures and just tell me whether or not you start salivating at the pictures.
Ingredients
5cm thick piece of white bread (white tastes best)
4 tbs butter
3 tbs honey
1 tsp cinnamon sugar
2 tbs caramel sauce
1 scoop vanilla ice cream or whipped cream (for a can is fine)
Method
1. Preheat the oven to 180 C.
2. Spread butter on one side of the bread.
3. Cut the bread into 9 cubes and keep the shape of the bread.
4. Sprinkle cinnamon sugar on the buttered bread.
5. Put the bread into the oven for 10 minutes or until golden brown.
6. Place scoop of ice cream on the centre, or a generous amount of whipped cream. Top with lashings of caramel sauce and honey. Serve immediately.
And there you have it, a delectable delight that will be sure to satisfy your taste buds and keep you cool this summer. A cinnamon-ey sweet treat that is amazing at Tom n Toms in the comfort of your own home. (I know the blue lemonade is amazing too, but I'm still in the process of figuring out how to make it)
Anyways, today's recipe is a Korean favourite. You may also love this dish if there is a Tom n Toms near where you live. There is the legend-wait for it-ary honey butter toast with ice-cream. It is absolutely AMAZING. And you know what? Today I'm going to show you how to make it at home.
It may not be exactly the same as what you can get in store, but it is a pretty good dupe and if you are like me, too lazy to actually go out and buy it you can enjoy it 24/7 at home. Honestly, for most of us it is too much of a hassle to go out to Tom n Toms unless it is literally right below where you live.
I don't know if you know about this dish much, but it is pretty much a thick slice of toast that is topped with various types of sweet things on top and it is absolutely delicious with the Tom n Toms blue lemonade.
Anyways, I'll tell you how to make it and then you can look at the pictures and just tell me whether or not you start salivating at the pictures.
Ingredients
5cm thick piece of white bread (white tastes best)
4 tbs butter
3 tbs honey
1 tsp cinnamon sugar
2 tbs caramel sauce
1 scoop vanilla ice cream or whipped cream (for a can is fine)
Method
1. Preheat the oven to 180 C.
2. Spread butter on one side of the bread.
3. Cut the bread into 9 cubes and keep the shape of the bread.
4. Sprinkle cinnamon sugar on the buttered bread.
5. Put the bread into the oven for 10 minutes or until golden brown.
6. Place scoop of ice cream on the centre, or a generous amount of whipped cream. Top with lashings of caramel sauce and honey. Serve immediately.
And there you have it, a delectable delight that will be sure to satisfy your taste buds and keep you cool this summer. A cinnamon-ey sweet treat that is amazing at Tom n Toms in the comfort of your own home. (I know the blue lemonade is amazing too, but I'm still in the process of figuring out how to make it)
It looks absolutely amazing doesn't it? It is a recipe that doesn't require anything too difficult to find so why aren't you going to the kitchen to make this right now? You're tastebuds will thank you. They seriously will.
I hope that you enjoyed this recipe a lot, I'm going to try and keep the blog posts rolling while I'm overseas, I might even do a blog post with just the photos of food that I've eaten. I hope that you have an awesome July and until next time remember to stay safe, healthy and happy!!! :D
Wednesday, June 26, 2013
육개장 YukGaeJang
Heyyyy dere sexy peoples.
It's been a really long time since I have posted a blog :/ I have been busy with finals for uni and completing assignments so there hasn't been any post for a really long time :( BUT I finished all of my exams yesterday, so I'm not back with a recipe. I'm going to be on break until August so I'll probably try and do a post a week, possible more sometimes.
I hope that you have all been well ~~~
Let's see how we are going in terms of seasons, it's now summer in Korea, so we probably want some summer food right? Even though it is not the hottest time of the year just yet, this dish can still be something that you can enjoy to help cool you down. And it is also great for the colder countries in the southern hemisphere where it is winter at the moment,
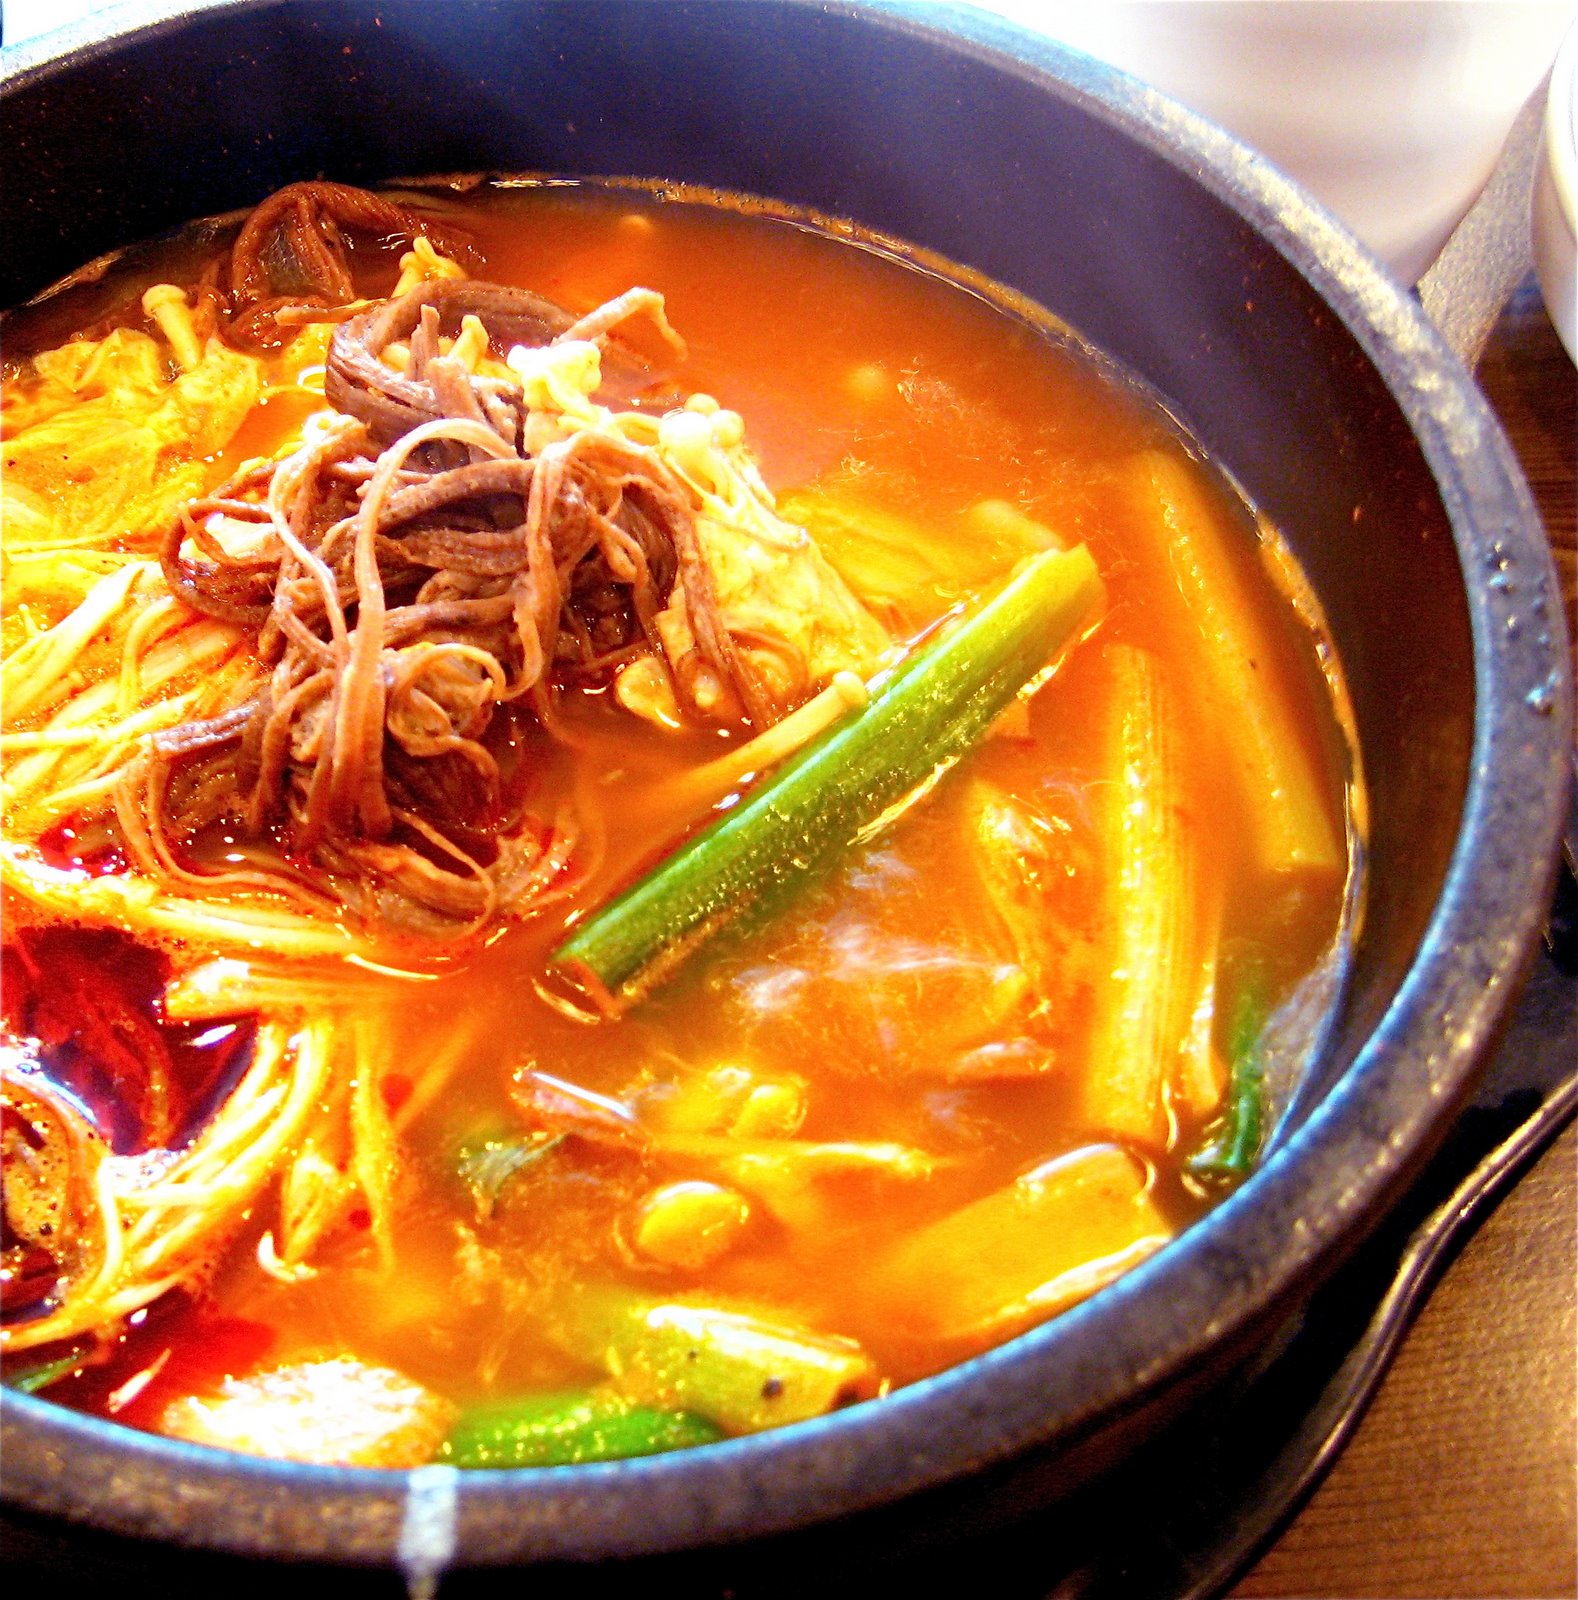
The dish for today is called yukgaejang (육개장). It is a spicy soup-like dish that is made with beef and scallions as well as other ingredients such as bean sprouts (kong namuel), bracken, taro stem, onion and dangmyeon (sweet potato noodles). It is usually served with rice and kimchi.
The dish can also be made using chicken, and in that case it could be called dak yukgaejang.
This is a hot spicy dish so you may be confused about why it would be eaten in the summer. Western cultures tend to eat cold foods to cool down in the summer, this cools you down from the inside. However in Korea, they also like to cool themselves down from the outside by eating hot spicy foods to sweat more and thus also be cooled that way.
Ingredients
600g beef brisket
1 small onion
100g bean sprouts
50g taro stem (found dried in Asian marts)
50g bracken (found dried in Asian marts)
3 green onions
1/2 korean radish
3 tbs chilli flakes (gochugaru)
2 tbs minced garlic
3tbs soy sauce
60ml sesame oil
60ml vegetable oil
3tbs salt
1tbs pepper
4L water
Method
1. Soak the taro stem and bracken in warm water for an hour.
2. In a large pot add beef, onion, green onions and all the water. Boil it for 30min on a medium heat with the lid on.
3. Blanch the soaked taro stems and bracken in water for about 10 minutes. Squeeze all the water out and then cut into 10cm pieces.
4. Cut the radish into 1cm pieces
5. Remove the cooked beef from the broth and let it cool for 30 min. After that, tear the beef into small strips.
6. In a bowl mix half the chilli flakes, with 3 tbs sesame oil, soy sauce, garlic, 1tbs salt and the pepper. If you want you can add more chilli flakes.
7. Add the bracken, taro stem and meat in a bowl with half of the sauce and let it sit for 10 minutes.
8. Add the sauce mixture into the broth with the radish and boil it for 40min on a medium heat.
9. In a small pot add all the remaining oil and chilli flakes and stir fry for 2 minutes, constantly stirring to prevent burning.
10. Strain the chilli oil through a cheesecloth.
11. Add some more green onions, bean sprouts, rest of the spicy sauce and chilli oil to the broth and salt to season. Boil for another 10 minutes.
12. Serve with rice and kimchi.
And there you have it, a nutritious dish to eat in summer or winter to cool you down or to warm you up. Either way it is bound to satisfy you.
It's been a really long time since I have posted a blog :/ I have been busy with finals for uni and completing assignments so there hasn't been any post for a really long time :( BUT I finished all of my exams yesterday, so I'm not back with a recipe. I'm going to be on break until August so I'll probably try and do a post a week, possible more sometimes.
I hope that you have all been well ~~~
Let's see how we are going in terms of seasons, it's now summer in Korea, so we probably want some summer food right? Even though it is not the hottest time of the year just yet, this dish can still be something that you can enjoy to help cool you down. And it is also great for the colder countries in the southern hemisphere where it is winter at the moment,
The dish for today is called yukgaejang (육개장). It is a spicy soup-like dish that is made with beef and scallions as well as other ingredients such as bean sprouts (kong namuel), bracken, taro stem, onion and dangmyeon (sweet potato noodles). It is usually served with rice and kimchi.
The dish can also be made using chicken, and in that case it could be called dak yukgaejang.
This is a hot spicy dish so you may be confused about why it would be eaten in the summer. Western cultures tend to eat cold foods to cool down in the summer, this cools you down from the inside. However in Korea, they also like to cool themselves down from the outside by eating hot spicy foods to sweat more and thus also be cooled that way.
Ingredients
600g beef brisket
1 small onion
100g bean sprouts
50g taro stem (found dried in Asian marts)
50g bracken (found dried in Asian marts)
3 green onions
1/2 korean radish
3 tbs chilli flakes (gochugaru)
2 tbs minced garlic
3tbs soy sauce
60ml sesame oil
60ml vegetable oil
3tbs salt
1tbs pepper
4L water
Method
1. Soak the taro stem and bracken in warm water for an hour.
2. In a large pot add beef, onion, green onions and all the water. Boil it for 30min on a medium heat with the lid on.
3. Blanch the soaked taro stems and bracken in water for about 10 minutes. Squeeze all the water out and then cut into 10cm pieces.
4. Cut the radish into 1cm pieces
5. Remove the cooked beef from the broth and let it cool for 30 min. After that, tear the beef into small strips.
6. In a bowl mix half the chilli flakes, with 3 tbs sesame oil, soy sauce, garlic, 1tbs salt and the pepper. If you want you can add more chilli flakes.
7. Add the bracken, taro stem and meat in a bowl with half of the sauce and let it sit for 10 minutes.
8. Add the sauce mixture into the broth with the radish and boil it for 40min on a medium heat.
9. In a small pot add all the remaining oil and chilli flakes and stir fry for 2 minutes, constantly stirring to prevent burning.
10. Strain the chilli oil through a cheesecloth.
11. Add some more green onions, bean sprouts, rest of the spicy sauce and chilli oil to the broth and salt to season. Boil for another 10 minutes.
12. Serve with rice and kimchi.
And there you have it, a nutritious dish to eat in summer or winter to cool you down or to warm you up. Either way it is bound to satisfy you.
I hope that you like that dish because it is certainly what I'm going to have for dinner tonight as it is super-duper cold and rainy at the moment. Have a try of it when it is super hot or cold and you will feel the heat of the dish radiate throughout the rest of your body.
I'm going to post more in the coming days, and until then remember to keep warm, safe, healthy and happy!
Sunday, May 5, 2013
Cookbook and Apple and Rhubarb Cake
Hey everyone, it has been so long since I've last posted a recipe and I'm really sorry about that but I've had exams. The exams are now over so I'll be posting a recipe tonight. But before I do that I have some very big news to share with you all.
I actually submitted one of the recipes on this blog for a cookbook competition at my university and it happened to get accepted. So it seems that one of my recipes is now going to be published into a cookbook. For those of you that are wondering the recipe was the one for the Gyeran Bbang, it's simple, cheap, delicious and perfect for a student like me. There was a photo shoot and all that jazz, and they are even going to film the recipe so you can also watch a video of it. There is going to be a book launch and everything, so I'm super proud about this and I'm so happy to finally be able to share it with all of you! If you haven't seen that recipe before do have a look at it, it's super scrumptious.
Now to move on to the blog for today. today's post is going to be a simple feel good dessert. It is starting to get cold here, as we start May so I thought what's better than a good old apple and rhubarb crumble. Only today I'm going to change it up a bit and convert it to a cake.
Apple and rhubarb cakes are wholesome and warm and are the perfect thing to keep you going on a cold night, or even as the spring approaches because that's technically the rhubarb season. A bit of custard or ice-cream on the side and you have the perfect dessert.
Ingredients
60 g soft unsalted butter
380g brown sugar
2 eggs
1 tsp vanilla extract
300g plain flour
1 tsp sodium bicarbonate
2 tsp ground cinnamon
1/2 tsp ground nutmeg
1/2 tsp ground allspice
1 cup sour cream
grated rind of 1 lemon
250g chopped rhubarb
250g chopped apples
80g brown sugar, extra
1tsp ground cinnamon, extra
Custard or ice-cream to serve
Method
1. Mix butter and sugar in processor until blended.
2. Add one egg at a time, mixing well between additions.
3. Add vanilla extract and mix well. Sift flour, spices and sodium bicarbonate together.
4. Fold into egg mixture alternatively with combined sour cream and lemon rind.
5. Fold rhubarb and apple in using a wooden spoon.
6. Spoon mixture into a 23cm spring form pan lined with baking paper on bottom and sides.
7. Combine extra brown sugar and cinnamon and sprinkle over cake.
8. Bake at 175C for about 1 hour and 50 minutes, or until cooked when tested with a skewer.
9. Cool in pan.
10. Cut and serve with a scoop of ice-cream or a generous amount of warm custard.
I actually submitted one of the recipes on this blog for a cookbook competition at my university and it happened to get accepted. So it seems that one of my recipes is now going to be published into a cookbook. For those of you that are wondering the recipe was the one for the Gyeran Bbang, it's simple, cheap, delicious and perfect for a student like me. There was a photo shoot and all that jazz, and they are even going to film the recipe so you can also watch a video of it. There is going to be a book launch and everything, so I'm super proud about this and I'm so happy to finally be able to share it with all of you! If you haven't seen that recipe before do have a look at it, it's super scrumptious.
Now to move on to the blog for today. today's post is going to be a simple feel good dessert. It is starting to get cold here, as we start May so I thought what's better than a good old apple and rhubarb crumble. Only today I'm going to change it up a bit and convert it to a cake.
Apple and rhubarb cakes are wholesome and warm and are the perfect thing to keep you going on a cold night, or even as the spring approaches because that's technically the rhubarb season. A bit of custard or ice-cream on the side and you have the perfect dessert.
Ingredients
60 g soft unsalted butter
380g brown sugar
2 eggs
1 tsp vanilla extract
300g plain flour
1 tsp sodium bicarbonate
2 tsp ground cinnamon
1/2 tsp ground nutmeg
1/2 tsp ground allspice
1 cup sour cream
grated rind of 1 lemon
250g chopped rhubarb
250g chopped apples
80g brown sugar, extra
1tsp ground cinnamon, extra
Custard or ice-cream to serve
Method
1. Mix butter and sugar in processor until blended.
2. Add one egg at a time, mixing well between additions.
3. Add vanilla extract and mix well. Sift flour, spices and sodium bicarbonate together.
4. Fold into egg mixture alternatively with combined sour cream and lemon rind.
5. Fold rhubarb and apple in using a wooden spoon.
6. Spoon mixture into a 23cm spring form pan lined with baking paper on bottom and sides.
7. Combine extra brown sugar and cinnamon and sprinkle over cake.
8. Bake at 175C for about 1 hour and 50 minutes, or until cooked when tested with a skewer.
9. Cool in pan.
10. Cut and serve with a scoop of ice-cream or a generous amount of warm custard.
And here is the recipe for my version of an apple and rhubarb cake. I hope that you guys enjoy it, enjoy the weather and the fresh foods that are available at this time of the year, it is usually one of the best.
I'll try and post more recipes up, until I have my final exams at least....so until the next post have fun, enjoy the sun but remember to stay healthy, safe and happy!
Friday, April 5, 2013
Steamed Egg Casserole 계란찜 Gyeran Jjim
It has been a REALLY LONG TIME SINCE I'VE LAST POSTED.
I didn't realise just how long it had been until earlier this week when I checked this blog. I am so sorry for not posting for so long, I've been juggling uni and work and just trying to find my footing as there are so many things going on.
Hopefully I'll be able to get into a regular schedule with these recipe posts once I've got everything sorted out.
To make up for not posting I'd like to tell you all that I managed to have over 1000 hits on my blog in the month of March, which was AMAZING because I didn't even post a recipe up. Thank you guys so much. You're what keeps me going.
And today I'm going to be sharing a simple recipe; nothing too fancy but comfort food. It's getting a bit colder in Sydney these day, especially over the past week so this will be a dish that is ready to warm you up.
Today's recipe is gyeran jjim (계란찜) or steamed egg casserole. You may be familiar with this dish if you are Chinese or also just Asian because this is a cheap dish that is often made by Asians on a cold day. It is simple and heart warming, what else do you need?
Today's version is going to be a bit more elaborate than the most basic form but none the less it will still be simple and delicious.
Ingredients
4 large eggs
1 1/2 cups of water
1/2 chicken stock cube
1/2 cup of spring onions, chopped finely
1/4 onion diced
1/4 zucchini, chopped
1/2 red pepper sliced
1/2 tsp salt
pinch black pepper
Method
1. Dissolve the stock cube in the water.
2. Crack the eggs into a heat safe bowl and whisk with broth.
3. Add all other ingredients and mix thoroughly.
4. Place bowl into a pot with hot water that goes half-way up. Cook over a low heat for about 15 minutes, ensuring that the water stays as a gentle simmer.
5. Sprinkle with some gochugaru if you want it to be spicy.
And there you have it, a super simple dish that is loved by all generations of Koreans and Asians
alike. It's great with it's silky smooth texture to serve with hot rice, or even as it's own.
I didn't realise just how long it had been until earlier this week when I checked this blog. I am so sorry for not posting for so long, I've been juggling uni and work and just trying to find my footing as there are so many things going on.
Hopefully I'll be able to get into a regular schedule with these recipe posts once I've got everything sorted out.
To make up for not posting I'd like to tell you all that I managed to have over 1000 hits on my blog in the month of March, which was AMAZING because I didn't even post a recipe up. Thank you guys so much. You're what keeps me going.
And today I'm going to be sharing a simple recipe; nothing too fancy but comfort food. It's getting a bit colder in Sydney these day, especially over the past week so this will be a dish that is ready to warm you up.
Today's recipe is gyeran jjim (계란찜) or steamed egg casserole. You may be familiar with this dish if you are Chinese or also just Asian because this is a cheap dish that is often made by Asians on a cold day. It is simple and heart warming, what else do you need?
Today's version is going to be a bit more elaborate than the most basic form but none the less it will still be simple and delicious.
Ingredients
4 large eggs
1 1/2 cups of water
1/2 chicken stock cube
1/2 cup of spring onions, chopped finely
1/4 onion diced
1/4 zucchini, chopped
1/2 red pepper sliced
1/2 tsp salt
pinch black pepper
Method
1. Dissolve the stock cube in the water.
2. Crack the eggs into a heat safe bowl and whisk with broth.
3. Add all other ingredients and mix thoroughly.
4. Place bowl into a pot with hot water that goes half-way up. Cook over a low heat for about 15 minutes, ensuring that the water stays as a gentle simmer.
5. Sprinkle with some gochugaru if you want it to be spicy.
And there you have it, a super simple dish that is loved by all generations of Koreans and Asians
alike. It's great with it's silky smooth texture to serve with hot rice, or even as it's own.
I hope that you liked that recipe, because I never realised that I had missed such a simple but humble dish in my blogging over the years.
I hope that you have had a great Easter, and I will try my best to keep up with posting and getting a routine going for this blog. Until then I hope that you all stay safe, healthy and most important of all happy.
Subscribe to:
Posts (Atom)